
When it comes to marketing your company, secrecy is sometimes the best policy. I’m referring to Facebook Groups, also known as the VIP way to gain valuable insights from and interact with your top customers.
The math is straightforward. On the one hand, organic Facebook reach is declining. On the other hand, 1.8 billion people say they use Facebook Groups at least once a month. These opt-in communities provide businesses with an excellent way to avoid the merciless Facebook news feed algorithm and connect with audiences who are more likely to see and interact with branded posts.
Here’s everything you need to know about the benefits of a Facebook Group for your business. Continue reading to learn how to establish one and grow it into a thriving and profitable community.
The benefits of setting up a Facebook Group for your business
Your company’s Facebook Page has its place, but there are some distinct advantages to incorporating Groups into your Facebook strategy:
Build long-lasting relationships with customers
People want to be in groups, so they are effective. Consider this: Would someone join a group for a company they don’t particularly like?
These are your #1 BFFs, and they’re ready to be your personal cheerleading squad. Solidify and strengthen that relationship by providing exclusive access to your company through a Facebook Group, as well as special content or privileges. (We’ll get to that later.)
Increase your organic reach
Your Facebook Page’s organic reach may be only around 5%, but your group’s reach will be much higher.
Facebook prioritizes posts from groups in a user’s newsfeed, so you have a good chance of being seen, especially when compared to Page posts.
Learn valuable market research data
Where else can you get direct access to your target audience and have your questions answered by real customers besides an organized marketing study?
The ability to test new strategies and ideas in this small focus group will provide you with a wealth of information. Your super fans will appreciate being “in the know” as an added bonus.
It’s a win-win situation. Oh, and did I mention it’s completely free? This data can be useful to anyone, from a brand new bootstrapped startup to mega-corporations.
Types of Facebook Groups (and which one you should pick)
It’s critical to consider this ahead of time. You can only change your group’s privacy in a few circumstances, so make sure you set it up the way you want it to stay.
TL;DR? Here’s a quick breakdown of public versus private Facebook Groups, but keep an eye out for the hidden or visible setting, which is explained further below.
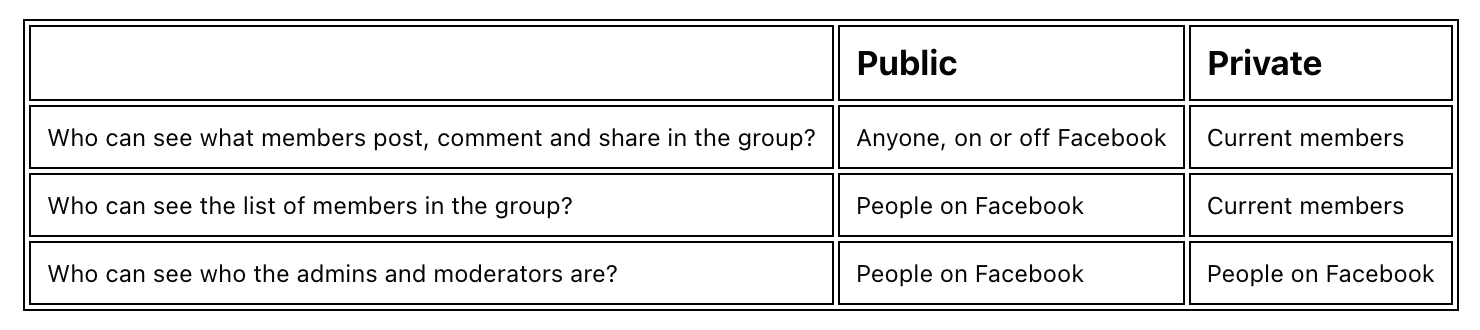
Source: Facebook
Public
Everyone can find public groups in search results. Importantly, the group’s content, including what members post and comment on, is also public. Anyone with access to the internet can also view the complete list of group members.
Google has even indexed those group posts and comments.
Users can join your group without the need for an administrator’s permission. It has a “we don’t lock our front doors around here” vibe to it.
I would not suggest forming a public group. Because anyone, including spammers, can join, you must pay close attention and delete any inappropriate or spam content that may harm your brand’s image. It’s only a matter of time before that happens, so why risk exposing your brand to it?
If you start a public group, you can later convert it to a private one. Because you can’t go back and forth from private to public, that change can only happen once.
Make your life easier by going private from the start.
Private
Private groups are classified into two types: visible and hidden. Let’s go over both of them.
Private – Visible
Members in private visible groups can only see posts and comments within the group, as well as the member list. However, these groups can be found in Facebook search results by all Facebook users.
There is no content in your group that is exposed as a result of this. Only the title and description of your group appear in search results if they match the keywords entered into the search bar.
Users may request to join your group, and you or another administrator must grant their request. They will only be able to view and post content after that.
For 99 percent of businesses, this is the best group type.
It enables you to manage membership and filter out spambots while remaining publicly discoverable by your target market.
Private – Hidden
Private hidden groups, also known as “secret groups,” have the same features as the groups mentioned above, but they do not appear in search results.
No one can see group posts, comments, or members, nor can they find the group in search results, on or off Facebook. Users must be provided with a direct URL in order to view the group and request membership.
This type of group is ideal for a truly VIP, invite-only community where you don’t want a large number of people to join. This type of group is commonly associated with a paid product or a specific focus or project group.
If you offer a support group in conjunction with a paid service or product, it makes sense to keep that group private so that non-purchasers cannot find and join your group. Instead, after a sale, you would only send the link to join to verified purchasers.
However, in most cases, I recommend going with a private, visible group.
Coming soon: Visual content groups
According to reports, Facebook will soon add a new group type that will only allow users to post images, videos, or very short text posts. Is it similar to Instagram in a group setting?
This is unlikely to be a good fit for most businesses, but it could be ideal for certain industries, such as creative challenge groups or a photography club.
Source: Facebook
How to create a group on Facebook
There are several ways to start a Facebook group:
- Using your computer
- In the Facebook app on your phone
- Using your own Facebook account
- Recommended: From your company’s Facebook Page (so that your Page, along with all of your Page’s administrators, is the group’s administrator)
Having your Page as the administrator of your group is a good idea for two reasons:
- It enables all current Page administrators to manage the group as well.
- Customers will see the administrator’s name, so keep this to your company brand rather than yourself as an individual.
To start your group, go to:
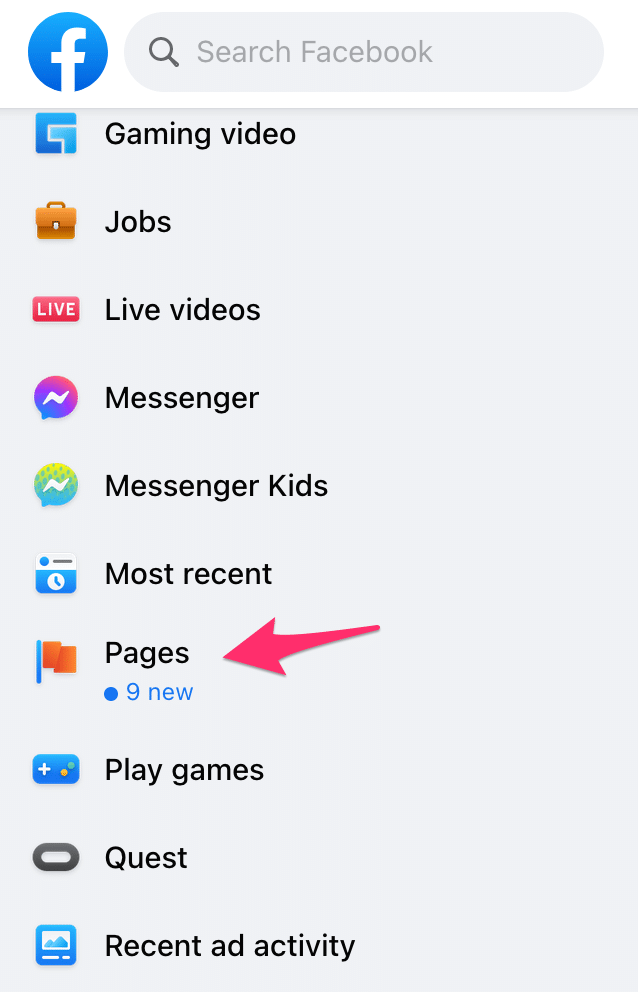
- Log in to your company’s Facebook Business Page using an administrator account.
- Locate Pages in the left-hand menu. It may be necessary to click See more and scroll to find it.
3. Click on the Page with which you want to form a group. Then, in your Page’s navigation, select Groups. You don’t see it? It’s possible that you’ll need to enable groups for your Page. Check out how to add tabs and sections to accomplish this.
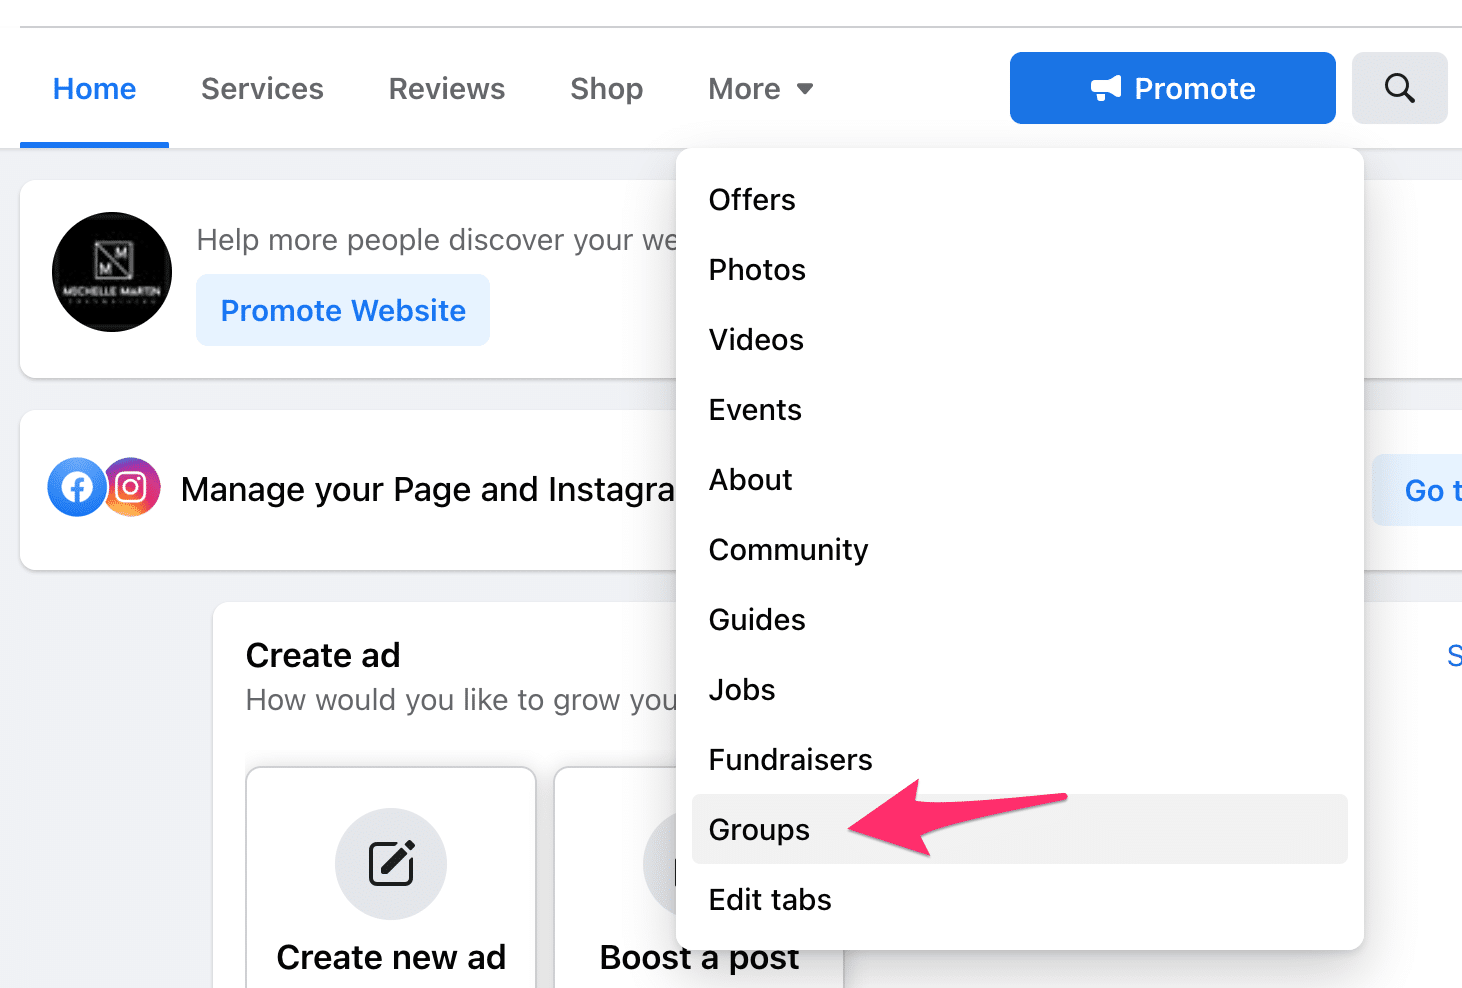
4. Select Create Linked Group.
5. Give your group a name and select the level of privacy. It is also possible to invite people who like your Page to join the group, but this is optional.
6. Your group is now operational! Remember to fill out the About section.