While you hear a fantastic song you may assume that a lot of money went into producing it, however, that’s not at all times the case.
With a small quantity of home studio-friendly audio gear, loads of musicians are creating music that finds plenty of listeners.
One cheap and easy-to-use piece of gear is the pop filter. It’s a confirmed approach to make an enormous difference in the sound of your vocal tracks.
In this guide, you’ll study everything you should know about a pop filter and find out how to use them. Let’s get began!
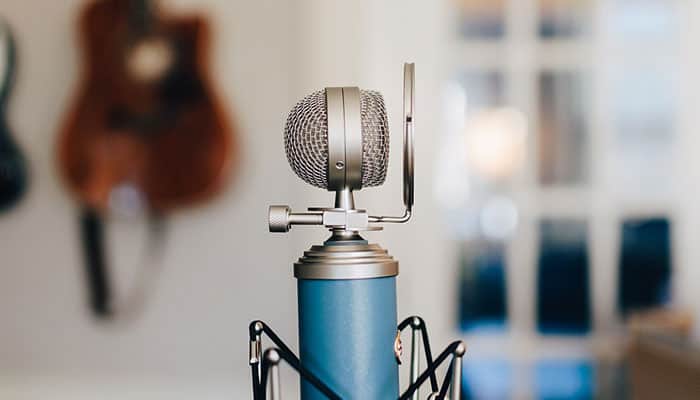
What’s a pop filter?
Pop filters are noise protection filters for microphones. They connect the mic stands and sit between the microphone and vocalist.
Whereas many items of recording gear are extremely complex and costly. Pop filters are very simple, however, they’re completely important for recording professional vocals.
Why do you have to use a pop filter?
You should at all times record vocals with a pop filter because it’s the simplest approach to filter out unwanted sounds. Pop filters are an important part of the standard setup for vocal monitoring, and your recordings won’t sound their absolute best without one.
Pop filters maintain pesky plosive sounds from showing up in your vocal takes. Plosive sound could be difficult and even inconceivable to remove via editing.
This means getting within the habit of recording with a pop filter will save you from a number of complications during mixing and manufacturing.
What are plosives?
Plosives are explosive sounds created by the rapid launch of air. Without a pop filter, vocals beginning with “p” and “t” and different sounds can produce loud plosives which are hard to get rid of.
Because it’s not logical or possible for singers to do their factor without creating plosives, every vocal setup wants a pop filter.
This is applicable for any genre whether or not you’re tracking rap vocals or a sensual pop ballad.
There’s no rule saying you need to use a pop filter to track vocals. However not utilizing one might produce unpleasant sounds that distract from your music.
How to decide on a pop filter
Pop filters can range anywhere from $15 to over $100, and they’re all designed to do the exact same thing. But it surely’s essential to notice that the cheapest ones tear easily and could be difficult to connect to your mic stand.
The Nady MPF-6 6-Inch is likely one of the world’s most popular pop filters. It’s reasonably priced however is thought to hold up effectively in recording settings.
For a little bit bit more money, the On-Stage Stands ASFSS6GB Dual-Screen is constructed with two screens to make sure that plosives won’t show up on your tracks.
Some pop filters are constructed with metal screens instead of mesh filters. The Avantone PS-1 PRO-SHIELD is designed to wrap around your microphone and retain high-frequency particulars that other pop filters remove.
For those who’re feeling ambitious, you possibly can construct your own pop filter utilizing cheap household materials. It takes time and planning to get the materials to do that, however, DIY pop filters have some good perks.
One of many biggest benefits of constructing your own is the power to easily change out mesh filters after they tear or get dirty. Standard pop filters aren’t constructed to do that.
Some microphones come with foam pop filters that slide on and off, like the SHURE SM7B.
Nonetheless, sound specialists recommend removing them and recording with an attachable pop filter to get the perfect sound quality.
Pop filters are often low-cost enough you could simply purchase another in case you don’t just like the one you’re utilizing.
In contrast to most studio gear, you possibly can take a trial and error strategy without destroying your budget.
Positioning your pop filter
Setting up your pop filter isn’t difficult. The most important factor to remember is that you’ll need to position it in an approach that feels natural for the vocalist. This means that putting it far away from the mic is a bad thought.
Before you start monitoring, have the vocalist try a take with the pop filter in place. In the event that they’re too far away from the microphone, make changes.
Every vocalist is different, so take a while to seek out what works. But if the only vocalist you record is yourself, you won’t have to do that each time you monitor.
Recording music is an ability that takes a number of following to master. Everything from mic positioning to preamp settings could be intimidating to consider in case you’re just beginning out.
Fortunately, pop filters are one thing you won’t have to fret over. By making them a fixed part of your vocal recording setup, you’ll get the perfect sound every time you monitor.