Despite its lesser fame compared to competitors, Reaper boasts a devoted fanbase that values its customizable interface, comprehensive features, and affordability. Whether you’re a seasoned audio professional or a beginner, Reaper deserves your attention as a potential DAW. Its unmatched flexibility, allowing shortcut and script creation, combined with its unwavering commitment to stability, sets it apart from other software options.
Despite Reaper having a slightly more challenging learning curve compared to other DAWs, its devoted user community and extensive documentation make mastering it a breeze. Once you’ve grasped its intricacies, you can harness its potent customization options to optimize your workflow and cater to your unique creative process.
Within this guide, we’ll offer an overview of Reaper DAW and its essentials, along with valuable tips and tricks to help you embark on your journey with this robust digital audio workstation.
Reaper fundamentals
Since its initial release in 2006, Reaper has undergone extensive updates, introducing a plethora of new features and enhancements.
Despite its relatively brief existence in comparison to other DAWs, Reaper has swiftly established itself as a robust and dependable tool for music production.
While Reaper is versatile enough to accommodate any music genre, it excels in specific workflows.
Here are some compelling reasons why Reaper might be the ideal DAW for you:
- You prioritize a customizable interface.
- You seek a cost-effective alternative to other DAWs.
- You work with diverse audio sources and require a versatile DAW capable of handling any project.
What makes Reaper so popular?
Reaper has become the go-to choice for countless producers and audio engineers due to its emphasis on flexibility and stability, catering to a diverse range of music creators.
Highlighted below are some of the features that have contributed to Reaper’s widespread popularity:
- Reaper is one of the most cost-effective DAWs available.
- The customizable interface enables you to tailor the workspace to your specific needs.
- Reaper supports a wide range of audio formats and plugins, making it compatible with various workflow styles.
- Its advanced editing capabilities, including MIDI and audio editing, provide precise control over your tracks.
- The comprehensive set of built-in effects and additional scripts serve as a solid foundation for your productions.
Considering these key features, it’s evident why Reaper has gained popularity among music producers across genres.
How to Purchase Reaper?
To start with Reaper, simply visit reaper.fm and download the software, which has a small 20-megabyte install file for quick installation.
In addition to its affordable price, Reaper offers a free 60-day trial, allowing users to fully test it before purchasing.
When you buy a Reaper license, you receive unlimited free updates for life, without extra charges for new features.
How to Begin with Reaper?
Many of the workflow elements in Reaper are shared with other major DAWs. However, there are a few things you should be aware of before making the switch.
Tracks
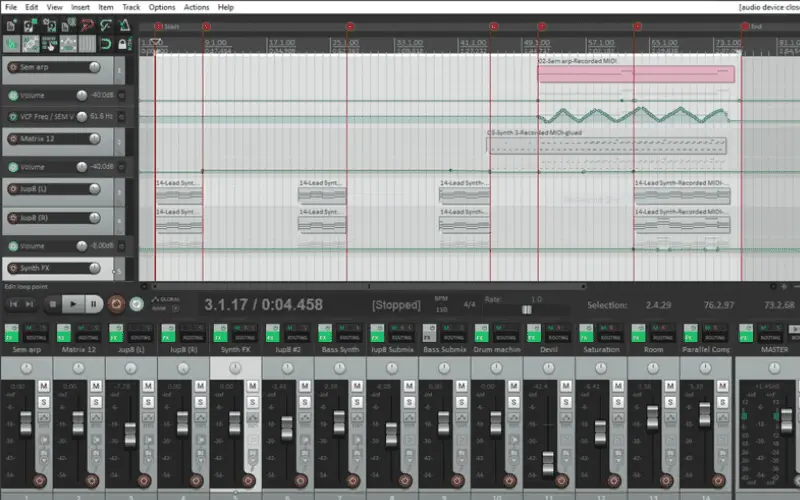
In Reaper, tracks serve dual purposes as audio and MIDI tracks, offering versatility. They can function as group tracks, holding multiple tracks, or act as folders.
To determine the usage of tracks in Reaper, examine the track routing options, which allow you to select either audio or MIDI input.
Utilizing the grouping parameters enables you to specify how the parent track interacts with the grouped tracks.
Mixer
The mixer in Reaper resembles those found in other DAWs, featuring familiar controls like faders, panning, mute, solo, track routing, phase, and an automation toggle. You can hide tracks on the mixer and timeline using the track manager function.
Based on your chosen theme, these controls can be hidden, and additional controls may be accessible according to your preferences. In Reaper, you have the flexibility to position the mixer wherever you desire and even detach it for use on a second monitor.
Effects and instruments
To access instruments and effects in Reaper, simply click the FX button on either the track in the timeline or within the mixer. While Reaper’s FX window may not have the most appealing design, it offers robust filtering and search capabilities to quickly locate the desired plugin.
Plugins and effects are conveniently listed on the left side, with the corresponding interface displayed on the right. To reorder plugins, easily drag and drop them within the list.
Playing and recording
Playing and recording in Reaper is as intuitive as in other DAWs. Just arm the desired tracks and press the record button. Depending on the track type, you can capture both MIDI and audio on the timeline.
The “Automatic record-arm when track selected” feature allows for effortless arming of tracks when clicked on. This means you can select multiple tracks and record them simultaneously without the need to arm each one individually.
Reaper offers standard features like tempo, time signature, section looping, and punch-in, ensuring a comprehensive recording experience.
Best Reaper Instruments
While Reaper may not have the extensive collection of built-in instruments found in popular DAWs like Cubase, Logic Pro, and Pro Tools, it does offer basic synth and sampler plugins. However, fear not, as there is an abundance of exceptional freeware instruments readily available that integrate seamlessly as plugins within Reaper.
ReaSamplomatic 5000
ReaSamplomatic 5000 is Reaper’s very own response to samplers like Ableton’s ‘Simpler’ and FL Studio’s ‘SliceX’. If you’re into sample-based music and crave playable sounds at your fingertips, this plugin is perfect for you.
Loading samples into ReaSamplomatic 5000 is a breeze. Simply click the “Load Sample” button or effortlessly drag and drop your samples directly into the plugin.
With the ReaSamplomatic 5000 plugin, you have the flexibility to assign samples to specific MIDI notes. On top of that, you can tweak the sound to perfection with intuitive controls for volume, pitch, and envelope adjustments.


