Thinking of leaving Facebook for good? Whether you want more privacy, less screen time, or a fresh start, deleting your account can be a big step. Before you press “Delete,” ensure to save any important photos and review your linked apps. Deleting your account also affects your Facebook data, so it’s important to understand what this means.
This guide will take you through each step, from backing up files to confirming the deletion. Follow these tips to ensure you leave nothing behind. If you’re ready to say goodbye to Facebook, let’s get started on your account deletion journey!
What Happens When You Delete Facebook?
Before going through with deletion, it’s essential to understand what it means. Here’s what happens when you permanently delete your Facebook account:
- Your Profile Disappears: Friends, family, and other users will no longer see your profile or your posts, likes, or comments.
- All Data Is Erased: Photos, videos, posts, and anything else associated with your account will be permanently deleted after a 30-day grace period.
- Access to Facebook Logins for Other Apps Will Be Lost: If you use Facebook to log into other services, you’ll need to switch to an alternative method.
- Messenger Will No Longer Be Available: Deleting Facebook means you’ll also lose access to Messenger, as it’s tied directly to your Facebook account.
Facebook does offer a temporary “Deactivation” option if you think you may want to return. This hides your account and preserves your data, allowing you to log back in at any time.
How to Deactivate Your Facebook Account
If you need a break from Facebook but don’t want to delete your account permanently, deactivating it is a quick and simple solution. Deactivating your account will hide your profile and posts, but you can reactivate it anytime. Follow these easy steps:
1. Start by logging into Facebook on your computer or mobile app. You’ll need access to your settings to deactivate your account.
2. Go to Settings & Privacy
- On a computer, click the arrow in the top right corner of Facebook and select Settings & Privacy.
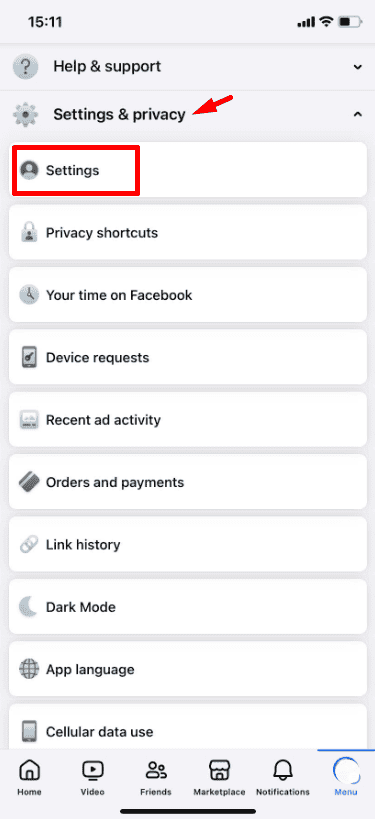
- On the mobile app, tap the three horizontal lines (menu icon) in the bottom right, scroll down, and select Settings & Privacy.
3. Within Settings & Privacy, select Settings. This will open up all options related to managing your account.
4. In Settings, find Your Facebook Information in the left-hand menu. Click on it to access options for managing your data.
5. Under Your Facebook Information, click on Deactivation and Deletion. This menu allows you to choose between deactivating or permanently deleting your account.
6. Select Deactivate Account and then click Continue to Account Deactivation to proceed.
7. Facebook will ask you to choose a reason for deactivating. Select one from the list, or choose “Other” if none apply. Then, click Continue to confirm.
8. Finally, enter your Facebook password when prompted, and click Continue to complete the deactivation.
How To Delete a Facebook Account
If you’re ready to leave Facebook for good, permanently deleting your account is the way to go. This will completely erase your profile, posts, photos, and data from Facebook’s servers. However, it’s important to note that deleting your account is final and cannot be undone.
Follow these simple steps to permanently delete your Facebook account:
1. Open the Facebook app or website and log into your account.
2. Click on the downward arrow in the top-right corner (or the three horizontal lines on mobile) and select Settings & Privacy, then Settings.
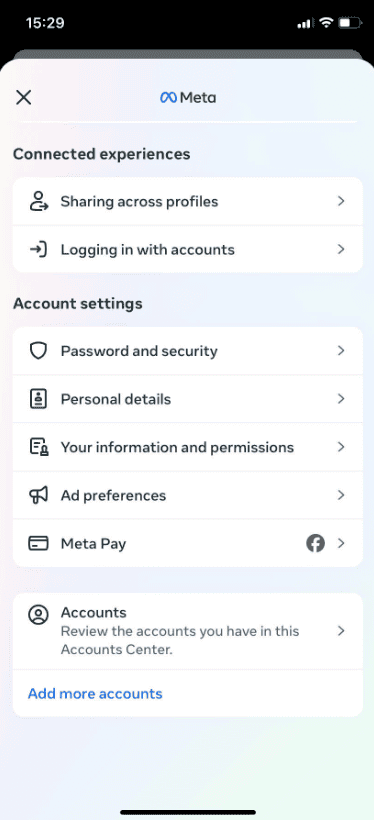
3. In Settings, scroll down to Accounts Centre. This is where you’ll manage your account details.
4. Inside the Accounts Centre, select Personal Details. This will take you to the page for managing your account.
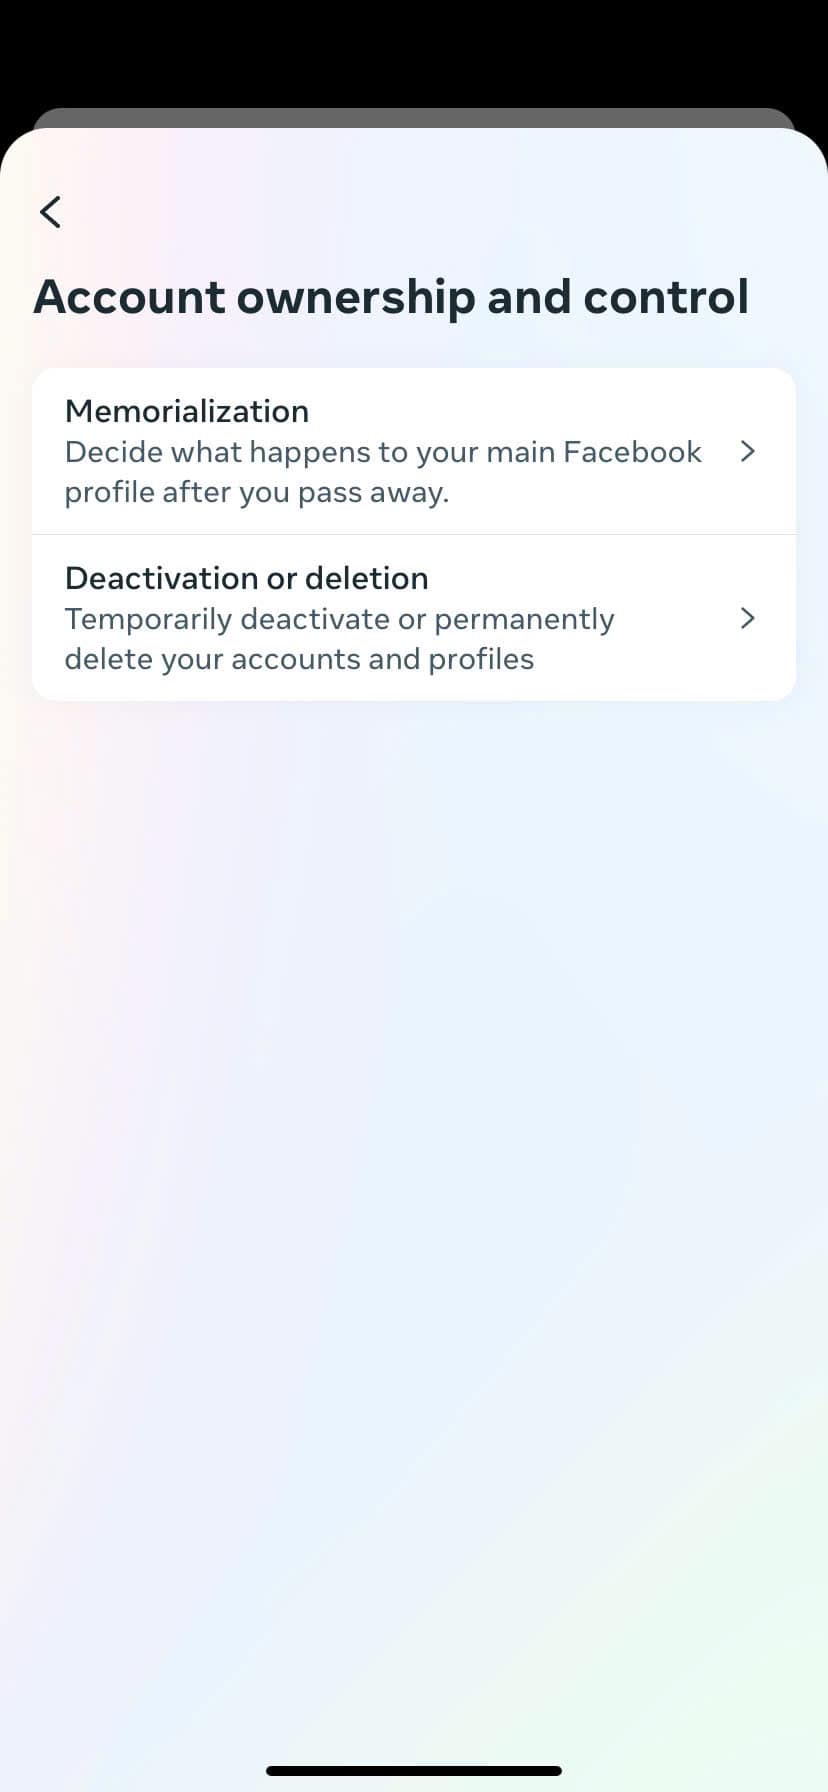
5. Under Personal Details, you’ll see an option for Account Ownership and Control. Select Deactivation and Deletion to proceed.
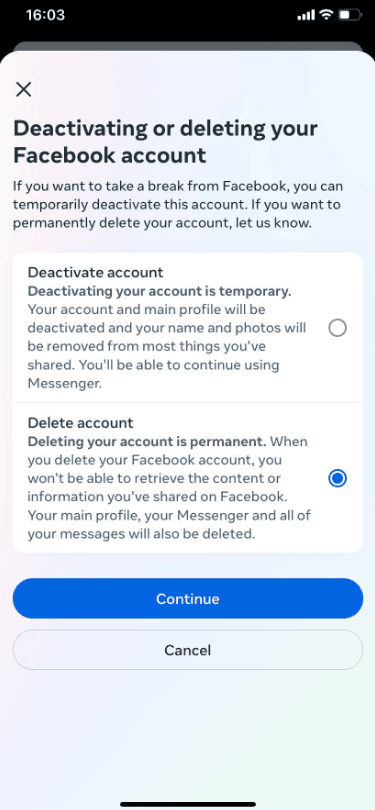
6. Choose Permanently Delete Account and click Continue to Account Deletion.

