Creativity is often compared to water well, sometimes it overflows but sometimes it dries up. The same is true in beat making. When beatmakers lose inspiration and feel difficult to come up with something new it’s called a beat block. Beat making is supposed to be fun, so when you find yourself hunched over your DAW without any inspiration coming to mind, it can be demoralizing. You can’t think of a creative way to write something fresh, so you don’t write at all–a vicious cycle starts to form. The good news is that the beat block is totally… beatable. So, if you’re stuck in your home studio seeking inspiration, here are a few tips to overcome the beat block and get you excited about beat making again.
soundcloud
To make money with music is not easy.
Waiting for one of your tracks to blow up isn’t a great plan, and even if your audience grows you’ll still have to find ways to earn money from them.
We’re not going to sit here and tell you the obvious ways that most musicians earn money with their musical skills.
We all know that teaching, touring or online streaming are all the main starting points to earn money.
Instead of it, we will discuss some of the more unconventional ways to make money with your producing music skills.
Here in this post, we provide you with the way to make money from your music with eight effective and creative ideas. You might not have considered these ideas yet. So, let’s start!
“Your submission has been rejected due to possible copyright-infringing material.” In case you’ve ever received the above message from your digital distribution provider, you know how dispiriting and confusing it is. The rules of copyright might be confounding – and infringement can have severe consequences. In the latest of a string of high profile cases, all royalties from Ed Sheeran’s monster hit “Shape of You” have been frozen, because of accusations of copying the chorus from Sam Chokri’s 2015 song “Oh Why.” So how do you prevent getting sued or rejected due to copyright infringement? What are the rules? What can you use? Does it matter in case you can prove that you never heard the track in question? In this article we’ll go through every part you want to know the way sample clearance works.
Now, the primary question to ask yourself is: which part of a file am I using – the composition, lyrics, or recording (sampling)?
Ready to jump into distribution? Here are the steps to follow and master digital distribution.
1. Find The Right Digital Distribution Platform
Ok, so your record is ready. You’ve mixed it and mastered it. Your album art is ready to go. You’re excited to get it out.
Now you might be wondering the way to get your music on platforms like iTunes, Spotify and all the other major stores. The first step is to find out for yourself the right online music distribution platform.
Music distribution is the connection between your final version of your record and your future fans. Here is a complete guide about music distribution.
Distribution is a crucial part of music promotion. Brick and mortar music distributors used to be the only way for record labels and independent artists to bring their records to the hands of listeners.
However, digital music distribution has taken the center stage. Digital surpassed sales of physical mediums for the first time in 2015.
As an artist, digital distribution has become a must do activity to reach all your potential fans. Smart distribution grows your visibility. It allows your music to go into as many ears as possible. And it helps you get paid for your music.
So here is a complete guide you need to know about digital music distribution and the way to do it right.
Distribution is the best way to get heard. However, how do you do it right? Music distribution is misunderstood. There’s way too much confusion about what it means, how it works, and how to do it effectively. And that’s when you’re ready to release. It’s changed a ton since digital distribution took over. So it’s time to clear up some of the confusion once and for all… Here are 7 common mistakes about music distribution you need to forget.
Keep reading to explore more knowledge if you need to know what Rhythm is and how to apply it to your creating music process.
The two most essential aspects of sound in mixing are dynamic range and frequency balance.
In terms of controlling frequencies in your mix, EQ is your main tool.
However, once you dial in your dynamics there are more options—gates, expanders, compressors, and limiters.
Of these four, limiters are maybe the least effectively understood.
In this article, we’ll explain what a limiter is, the way it’s different from a compressor, and how to use limiters in your tracks.
Let’s get started.
What is a limiter?
A limiter is a hardware or software audio processor that stops a signal from increasing in loudness above a set threshold.
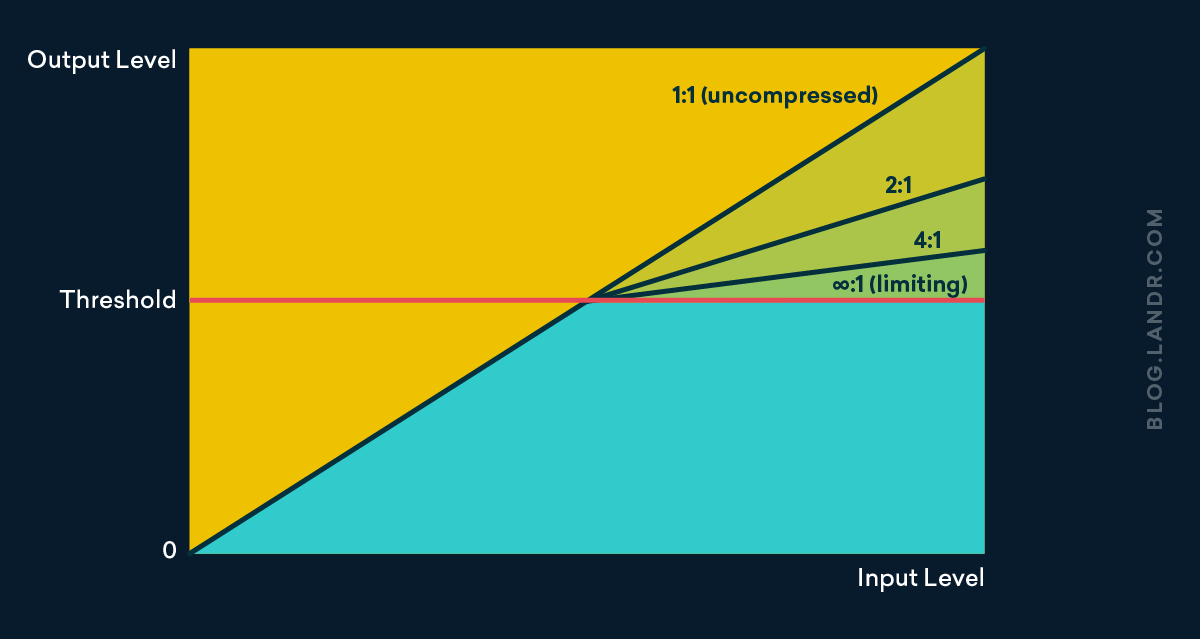
You may think of a limiter like a compressor with an extremely high ratio—∞:1 to be exact!
I’ll go over the basics in this article however if you need a refresher on compressors and dynamic range. Let’s take a look at a guide to audio compression from LANDR.
Looking at the graph for a limiter you may see how the two types are related:

Where a compressor would only attenuate the signal above the threshold, the limiter won’t let any material through.
Compressors typically have ratio settings of 1.5:1-10:1, however, true limiters always have the same ratio of ∞:1.
Compressors typically have ratio settings of 1.5:1-10:1, however, true limiters always have the same ratio of ∞:1.
Limiter settings
Limiters feature similar controls to many compressors.
The threshold sets the level where the limiter will begin work. Bring this down until the limiter begins stopping the signal where you want it.
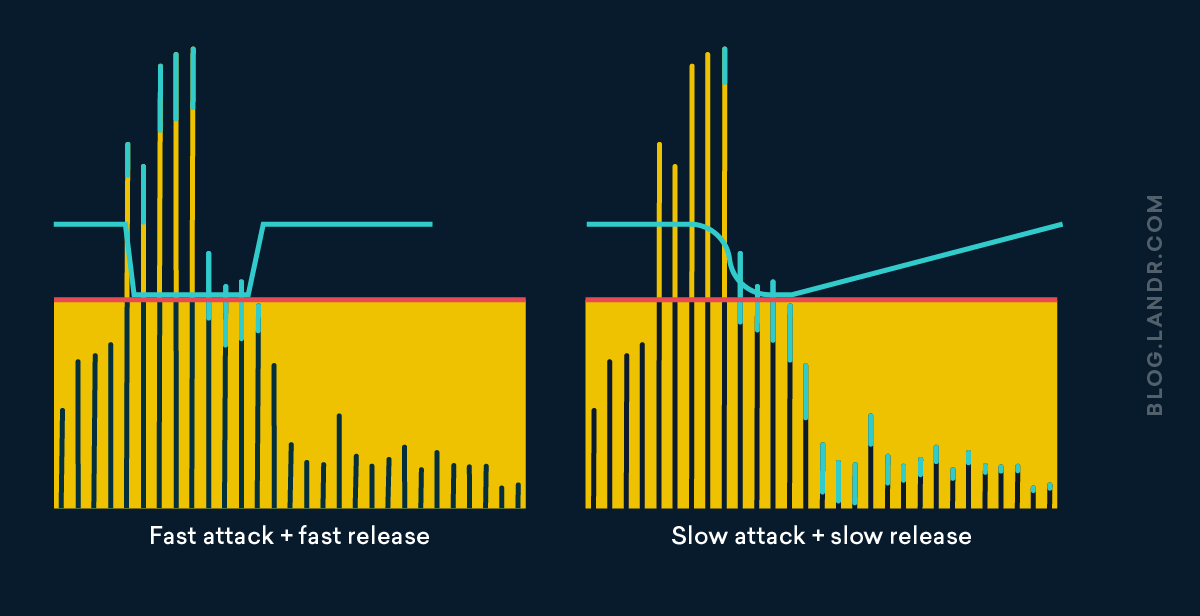
The attack and release settings control the timing of the gain reduction—how fast or slow it comes in or out.
Slow attack times mean the limiter will kick in more gradually, letting more of the initial transient of the sound through.
Fast attack settings sound aggressive and clamp down on the signal almost immediately.
Fast release settings bring the gain reduction out quickly after the signal decreases below the threshold. This can improve the feel of rhythmic material when set correctly, however, it creates an unnatural pumping sound in case you’re not careful.
Slower release times gradually ease off on the gain reduction and can sound more transparent.
Limiters sometimes include a knee control that makes the onset of the limiting more gradual. However, that is less common since most of the time you’ll be using a limiter to stop a signal in its tracks.
Finally, since their impact can be so extreme, limiters often feature a lookahead control that allows them to close down on the signal a few milliseconds before the transient.
This can help when fast attack times sound unnatural however you still need to limit the earliest moments of a signal.
When to make use of a limiter
Limiters can be used in any situation where you want to cap the intensity of a signal at a defined level.
For instance, they can work effectively on percussion in situations where some hits are much louder than others and need to be tightly controlled.
This may happen on vocals as well if the singer’s style is extremely dynamic. Try using a limiter if other methods like automation or clip gain aren’t working.
Some engineers use analog limiters or DSP limiters while tracking to ensure that stray peaks don’t clip the recording medium. That is much less common with the high headroom available in digital recording.
Avoid limiting on the way in unless you’re extremely confident with your gear or you’re recording a highly dynamic source.
Master bus limiter: should you use one?
Probably the most common use for limiters is on the master bus of your entire mix.
Some producers do this in every session, however, the practice is pretty controversial. Here’s why.
Adding plugins to your master bus can create sweeping changes in your mix very quickly.
That is completely fine if you’re only adding a band or two of EQ to sweeten the mix or a few dB of gentle compression for extra weight.
Any master bus processing like this that gets you closer to the feel and character you want for your track shouldn’t cause any problems.
However, as soon as you cross over into huge changes like limiting, you can do real damage.
A limiter is a very aggressive way of reducing the dynamic range of a signal. Once you flatten those dynamics, you’ll never get them back.
A limiter is a very aggressive way of reducing the dynamic range of a signal. Once you flatten those dynamics, you’ll never get them back.
And many limiters are designed to trade those dynamics for an extra level at the output. In any case, the less dynamic the signal, the closer to the available max you can push it.
This is a method that limiters work during the mastering process. However, using limiting to reduce dynamic range and boost levels during your mix is always a bad idea.
The tools used in the mastering process are much better equipped to take care of this delicate job of raising levels and turning headroom into raw volume.
If you limit your mix so hard that there’s nowhere left to go, there won’t be any space for the mastering processors to work their magic.
If you limit your mix so hard that there’s nowhere left to go, there won’t be any space for the mastering processors to work their magic.
And once you get close to the maximum like this, other issues come out of the woodwork too.
Does your limiter handle inter-sample peaks correctly? Does it have effective oversampling to deal with aliasing and lookahead? What about pre-ringing?
These issues are complex and technical however you can avoid them completely by skipping the limiter on the master bus.
The sky’s the limiter
Limiters are just like another tool in music production. They play an essential role in an excellent mix when used properly.
Now that you know how limiters work and once they’re wanted in a mix. Get back to your DAW and keep producing.
In this article, we will go through how to make a Lo-fi beat with AI with example from LANDR – one of the huge musical sources. We will come back with using Selector – the world’s first AI sample recommendation tool.
Starter Loop: Lo-fi Melodics from Skifonix
We will start this session with a jazzy guitar lick from a sample pack known as Lo-fi Melodics on LANDR.
This sample is one of the 10 best lo-fi sample packs according to an analysis on LANDR for an article.
This one stuck out to us for its quick runs and jazzy chords.
The lo-fi texture of the sample inspired us, It should be the place where you should begin building a beat.
So, in this session, we will use Selector to help us discover the loops I need to construct a lo-fi beat that complements this starter loop.
We’ll put Selector to the test and see what loops AI suggests we use in our beat.
At the end of the article, you may hear the final product!
We’ll put Selector to the test and see what loops AI suggests we use in my beat.
Selection 1: Top 06 from Apex Audio
Since we began with a guitar loop, the following thing the track needs is a percussive element to drive the beat along.
To complement the higher frequencies in the guitar loops we will discover a hi-hat loop to get the high end of the percussive elements in my beat started.
We put a hi-hats only filter on the Selector results from our starter loop and wound up with about two pages of samples.
We put a hi-hats only filter on the Selector results from my starter loop and wound up with about two pages of samples.
After going through pretty much all of them we finally settled on this washy sounding loop that seems to incorporate sidechaining and reversing effects.
It’s not your typical hi-hat sound, however, that’s kind of what I like about it!
The hi-hat loop has enough rhythm to drive the track along and the sound complements the lo-fi elements in the starter loop.
Alright, we have half a drum kit and a guitar loop to play within my DAW.
Now it’s time to add kick and snare.
Selection 2: Kick and Snare 04 from Apex Audio
We hit the Selector button on my hi-hat loop however this time we filtered the results pages for just kick and snare.
Again, the Selector returns about two pages of kick and snare loops.
Sifting through the loops we settled on this bottom loop because it leans into that classic lo-fi sound.
Aside from the crunchy and subdued sound of the kick and snare, I like the rhythm itself.
The loop uses that classic minimal R&B rhythm inspired micro delayed MPC style quantization that was pioneered by beat-making legends like J Dilla.
You hear in a lot of lo-fi beats today too.
The result is pretty satisfying once I put it in my DAW.
Alright, we have a full kit going and it complements our loop pretty well.
Now it’s time to roll the dice a little bit and try to discover something in the low end to complement our guitar track.
Selection 3: OL1 Bass from Opium Lounge
To complement our guitar loop we may put a bass guitar filter on our Selector results.
To complement our guitar loop we put a bass guitar filter on our Selector results.
Nice, we get about 26 bass loops on our Selector session.
I’m looking for something that matches both the melodic and rhythmic elements of our guitar loop and two of those samples from the Opium Lounge works best.
The bass guitar loops are both in the same key and they seem to use the same tone.
I like how the bass in these loops have funky long and short notes that may line up with the chord hits and runs in our guitar loop once we chop them up in Ableton.
What drew us to the loops in the first place is their tone. Somehow they both remind me of funk and jazz bass legend Jaco Pastorius’ tone.
Jaco’s track A Portrait of Tracy comes to mind in particular.
The bass loops come in A# minor, so once we throw it in my DAW we will have to transpose them down a couple of steps to match the guitar in D minor.
They match okay however we will need to spend some time tweaking the bass loops to make them suit the guitar track a little bit better.
Putting it all together
It might sound counterintuitive, however, sometimes putting limitations on yourself can help with sparking creativity in your songwriting.
I this case we limited ourselves to using only the recommendations that an AI tool gave.
It was pretty fun to work with these limitations and I think it produced an interesting result.
To finish our beat we will do a little bit of arranging, EQ, and sidechaining in my DAW.
Plus you can master your track once you bounce the final version.
There’s nothing better than finding the perfect samples for your track.
However, scrolling aimlessly through random sample packs using text-based search is boring and barely ever works.
Selector is the brand new AI tool that allows you to discover the suitable samples faster.
A selector is your crate-digging companion and your guide to the millions of samples now available on the Internet. We recommend you to check this source – LANDR Samples.
In this article, we will show you use Selector to find the right samples that compliment each other perfectly—and use them in your production.


