Do you have problems uploading videos to YouTube from your iPhone? You’re not alone—this issue is commonly reported on various online forums. But don’t worry, we’ve got you covered! We’ve researched this problem and found practical solutions just for you. Read on to discover simple steps to fix your upload issues and get your videos online seamlessly.
Let’s begin!
Why You May Get an Error Uploading a Video on YouTube?
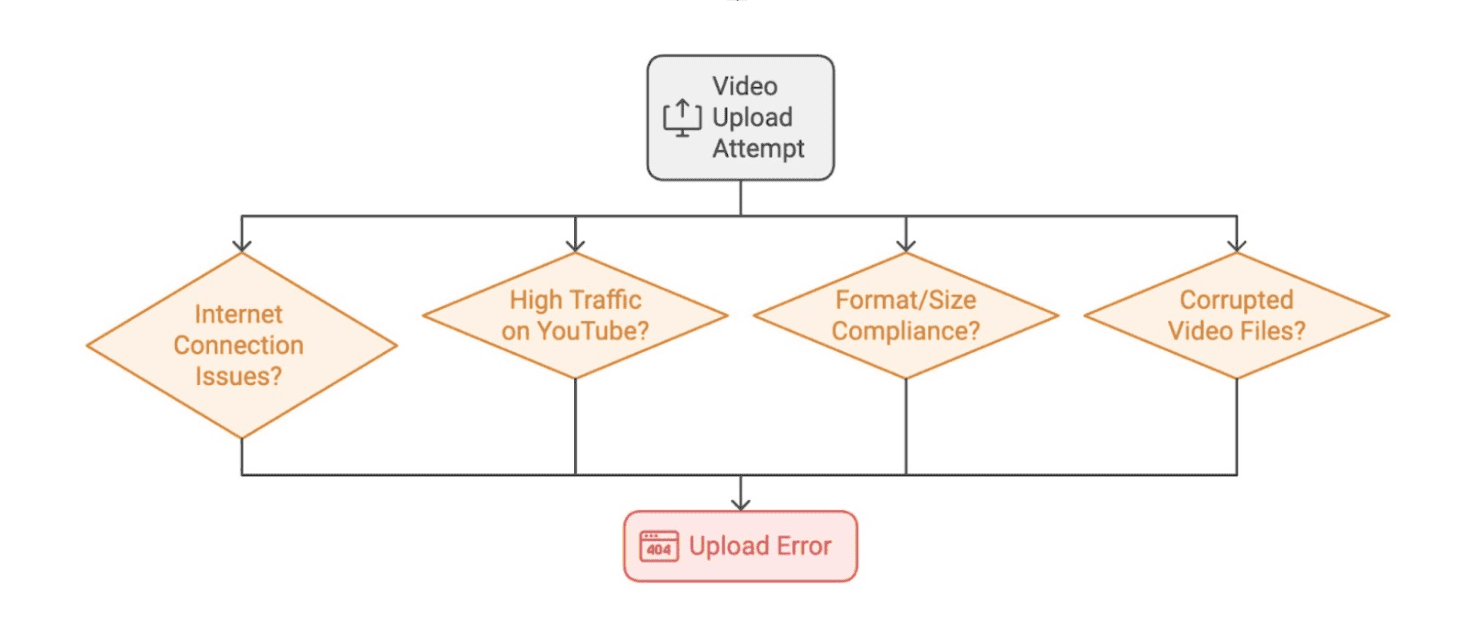
In our analysis of this issue, we found that many users concluded that a malfunction within the YouTube platform caused upload failures. However, this explanation does not always apply. Below, we outline various reasons you might encounter errors when uploading a video from your iPhone to YouTube. We will briefly describe these causes and expand on each in the following sections.
Problems with your internet connection often disrupt the upload process. A slow or unstable internet connection can cause video uploads to fail or time out.
- High traffic on YouTube can also cause upload delays or errors. During peak hours, high upload activity can overload the servers and temporarily prevent video uploads.
- If your video does not meet YouTube’s format or size requirements, it will not upload. YouTube supports specific formats but has limitations on video size and length. Uploading a file that deviates from these specifications typically results in an upload error.
- Corrupted video files fail to upload. Corruption can occur due to issues during file transfer, improper file formatting, or disruptions during video creation. Such files often exhibit errors during playback or fail to load entirely.
How to Solve the Problem of iPhone Video Not Uploading to YouTube
In this section, we outline various methods to address the issue of videos not uploading to YouTube, from basic troubleshooting steps to more technical solutions. You can review all the options provided and select the method that best suits your needs or apply them sequentially until you resolve the issue. Each method guides you through specific actions you can take to guarantee your video uploads without interruption.
Tip 1. Check Your Internet Connection
Before you attempt to upload a video from your iPhone to YouTube, you must verify your internet connection. A stable and fast connection forms the foundation for a successful video upload. We recommend using a Wi-Fi connection rather than mobile data, as Wi-Fi typically provides greater stability and higher speeds necessary to transfer large video files.
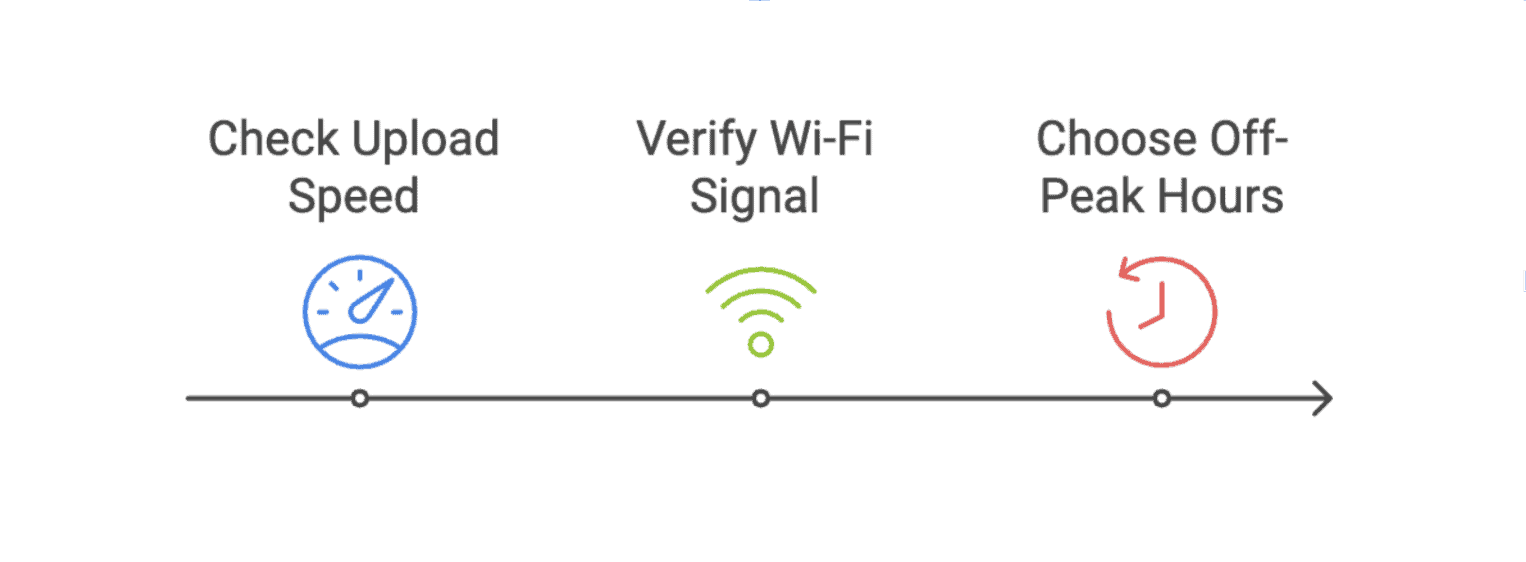
Use an online speed test tool to check your upload speed. A minimum of 5 Mbps is advisable for video uploads, but higher speeds will result in faster upload times.
- Verify that your Wi-Fi signal is strong and stable. Weak signals can disrupt the upload process.
- Upload videos during off-peak hours when the network experiences less congestion. This can improve upload speed.
Tip 2. Wait and Upload the Video Later
Besides issues with your network, YouTube’s servers can experience high traffic, especially during peak hours. These periods typically occur in the late afternoon and early evening when most users are active online. If your upload progress stalls during these times, server overload might be the cause. In such instances, waiting and trying to upload your file later is the only solution.
Tip 3. Restart Your YouTube App and Re-Upload the Video
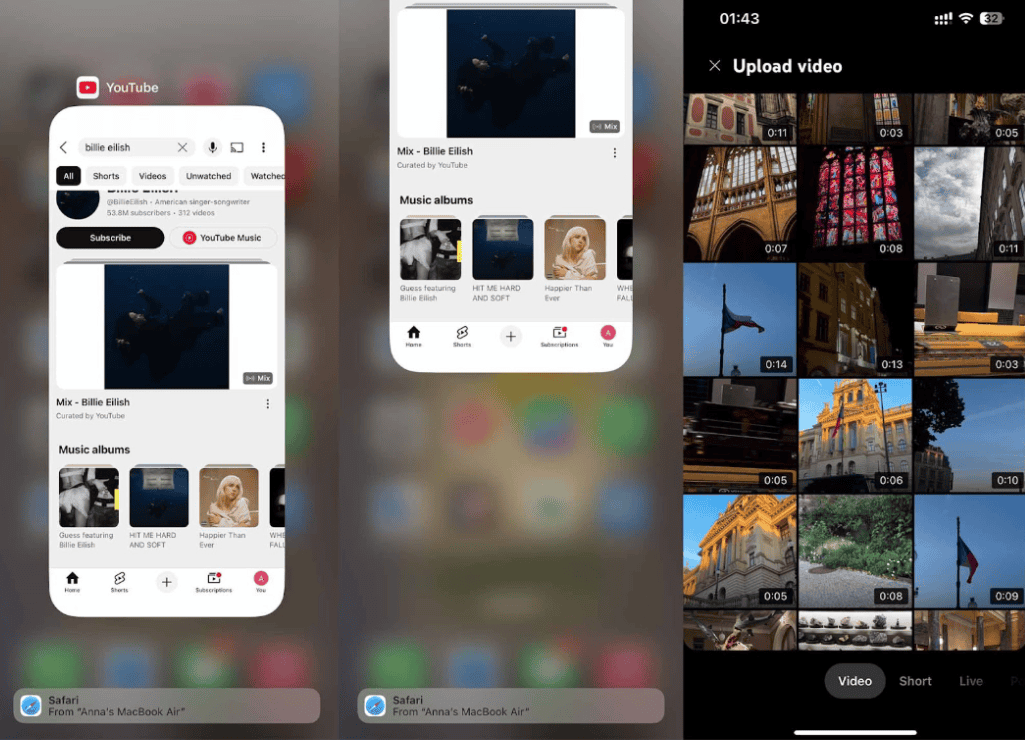
If your video fails to upload, restart the YouTube app. This action refreshes the system and clears potential errors that might have occurred during the initial upload attempt. Restarting the app often resolves issues caused by temporary glitches or overloads within the app itself.
Pro tip: You should also clear your watch history before you restart the app. This process reduces the amount of data the app needs to manage, which can free up system resources and potentially improve app performance.
1. Clear your watch history.
2. Swipe up slightly from the bottom of the screen and hold your finger in place until you see the App Switcher appear. This shows all the apps currently open in the background.
3. Swipe up on the YouTube app to close it. This action removes it from the list of open applications.
4. Reopen the YouTube app after a few seconds.
5. Navigate to the upload section within the app.
6. Select the video you wish to upload again and initiate the process.
Tip 4. Check the Settings of Your Video
YouTube specifies recommendations for video parameters that provide compatibility and optimal playback quality. These parameters include file type, codec, frame rate, and other aspects necessary for successful uploads.
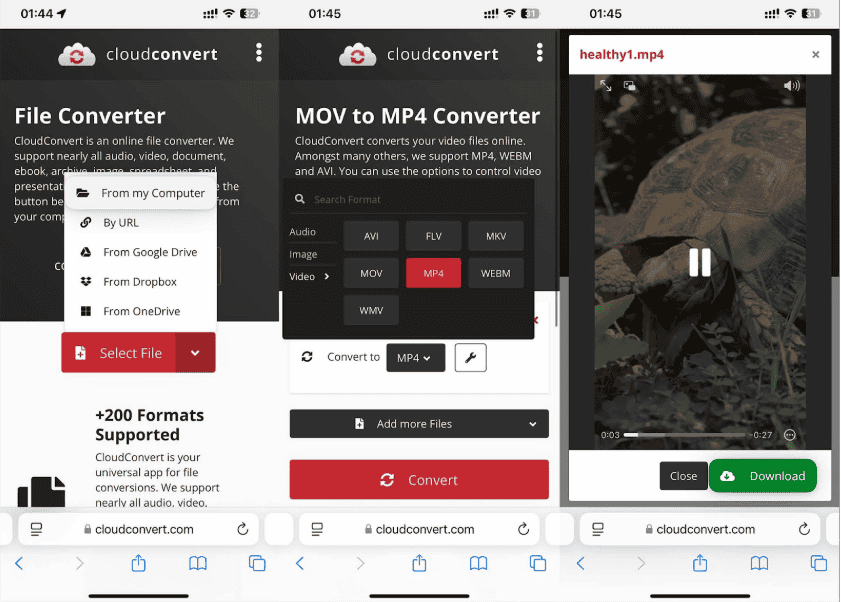
One common issue for iPhone users is the file format; iPhones typically record videos in MOV format, whereas YouTube prefers MP4. However, you can easily change the video format, which can be accomplished directly from your iPhone with an online converter. We will demonstrate the steps using CloudConvert as an example, but the process remains similar across various converters.
1. Open your browser and navigate to the CloudConvert website or any other online video converter you prefer.
2. Tap on ‘Select File’ and choose the video you want to convert from your iPhone’s storage.
3. Once the video is uploaded, set the output format to MP4 by selecting it from the available options.
4. Tap ‘Convert’ to begin the process. The converter will transform your MOV file into an MP4 format.
5. After the conversion is complete, download the MP4 file to your iPhone.
6. Open the YouTube app and upload the newly converted MP4 file.
Tip 5. Repair Corrupted iPhone Video
A more severe issue when your YouTube video won’t upload from your iPhone is file corruption. This problem can occur while you record or edit the video, and you might not notice it until you try to play it. To confirm, attempt to play the video on your iPhone. If playback fails or shows errors, you must repair the video file.
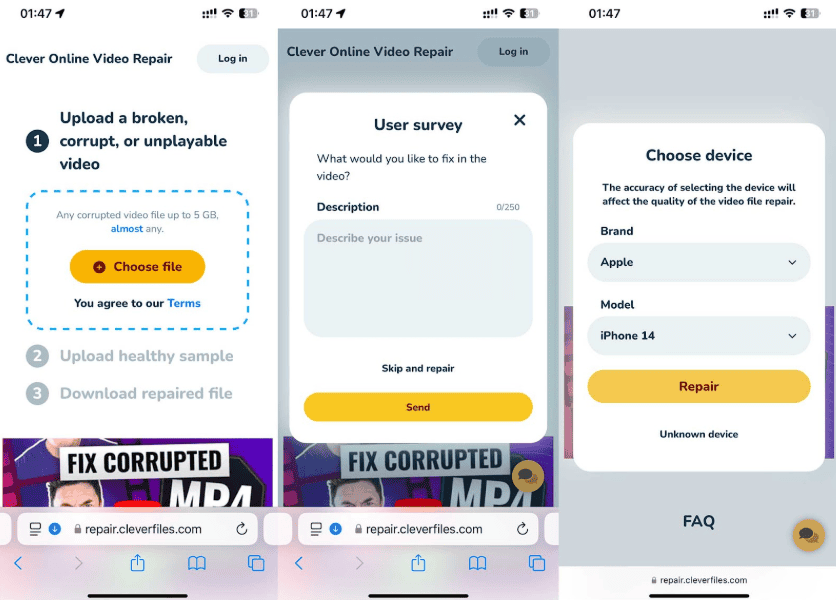
For video repair, we recommend Clever Online Video Repair. This tool is free, user-friendly, and accessible directly from your iPhone or computer. Since it operates online, you can conveniently use it on any device. Importantly, you need a reference video shot with the same settings as the corrupted file—for the repair.
1. Navigate to the https://repair.cleverfiles.com/ website, tap ‘Choose file,’ and select the corrupted video file from your storage.
2. You may encounter a dialogue that asks you to describe the events leading to the video’s corruption. You can provide details or skip this step.
3. Choose your iPhone’s model from the dropdown menus. This step helps tailor the repair process to your specific equipment.
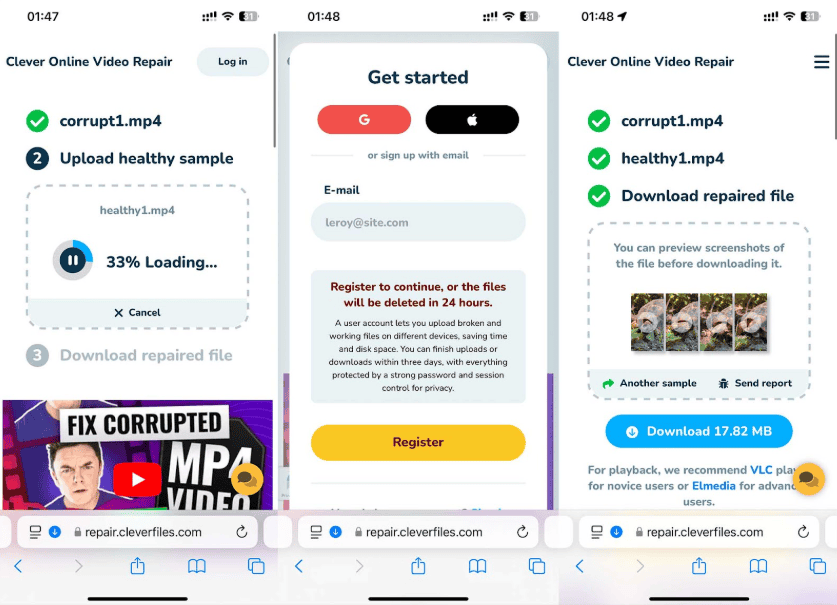
4. Tap ‘Choose file’ again and upload a reference video.
5. To proceed, you must create an account. You can quickly sign up with your Google or Apple account. Once you are logged in, the repair process will start automatically.
6. After the repair, preview the frames from the repaired video by clicking on any available screenshots. If the video meets your expectations, download it to your device.
7. Finally, try to upload the repaired video to YouTube again.
Tip 6. Relocate the Moov Atom with FFmpeg
Another technical issue that might prevent a video from uploading correctly to YouTube is the placement of the ‘moov atom’ in the file structure. The moov atom contains important metadata about the video, such as duration, display characteristics, and indexing information. For playback and processing, YouTube recommends that the Moov atom be at the beginning of the file. However, videos recorded on iPhones typically place the moov atom at the end, which can delay the start of playback and affect upload processing.
To resolve this, you can use FFmpeg, a powerful multimedia framework that processes almost any video file. FFmpeg operates through command-line instructions and does not feature a graphical user interface. If you are unfamiliar with command-line tools, it is advisable to review the documentation on FFmpeg’s official website or other tutorial resources before proceeding.
Note: Because FFmpeg interacts directly with the file structure, we recommend creating a copy of your video that you do not intend to upload to YouTube. This precaution guarantees that if any issues arise during processing, you can revert to the file’s original state.
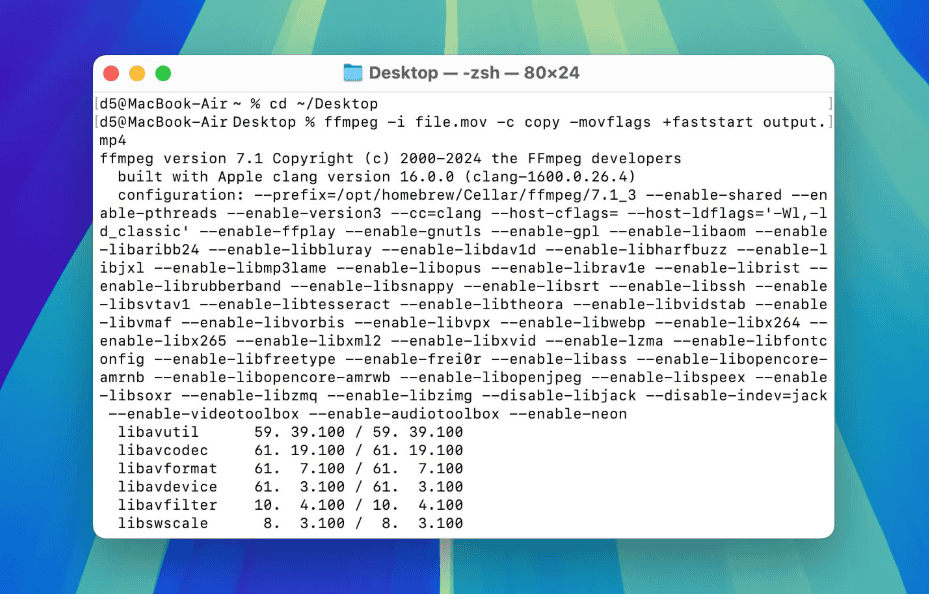
1. Access the terminal through your applications folder or search function.
2. If you do not have Homebrew installed, run the following command: /bin/bash -c “$(curl -fsSL https://raw.githubusercontent.com/Homebrew/install/HEAD/install.sh)”.
Note: Homebrew makes the installation of software on macOS and Linux easier.
3. Once Homebrew is ready, install FFmpeg by executing: brew install ffmpeg.
4. Navigate to the directory containing your video file with the cd command.
5. Run the following command ffmpeg -i input.mov -c copy -movflags +faststart output.mp4. In this command -i input.mov: Specifies the input file; -c copy indicates that the conversion should copy all streams (audio, video, and possibly subtitles) without re-encoding; -movflags +faststart moves the moov atom to the beginning to facilitate faster start-up during playback.
6. Check the output file output.mp4 to verify it processes correctly.
7. Attempt to upload the newly created output.mp4 file to YouTube and check for improved upload and playback performance.
Conclusion
In this article, we addressed the common problem of videos not uploading to YouTube from your iPhone and provided structured solutions to troubleshoot and resolve this issue. Each method we discussed aims to optimize the upload process: verify that your internet connection is stable and modify video file properties for better compatibility with YouTube’s requirements.
When you apply these strategies, you improve your ability to share your content reliably on YouTube. We encourage you to review and implement these methods as needed to overcome any obstacles in your video upload process.
FAQs
Can multiple videos be uploaded to YouTube at once?
YouTube does not allow users to upload multiple videos simultaneously from the YouTube app or website. You must upload each video individually. However, batch uploads are possible with third-party software that supports queued uploads.
What file formats does YouTube not accept for uploads from an iPhone?
YouTube does not accept video files in the following formats from any device, including iPhones: DIVX, MPEG-2, MPEG-2 DVD, MSVIDEO, QT, QuickTime MOV, RM, VOB, and WMV7. Before uploading, you should convert these files into supported formats like MP4, AVI, or MOV.
What is the maximum video file size I can upload to YouTube from my iPhone?
YouTube allows you to upload videos up to 128 GB in size or 12 hours in length, whichever is less. If your video exceeds this limit, you must compress or split it into smaller parts.
Why do my videos get stuck at 95% when uploading from my iPhone to YouTube?
Videos often get stuck at 95% due to issues related to internet connectivity or server-side processing at YouTube. To resolve this, verify you have a stable and fast internet connection. If the problem persists, cancel the upload and try again at a different time when the network might be less congested.

