
Hey there, if you’ve ever thought, “I need a break from Messenger,” you’ve stumbled upon the right place! Deciding to deactivate your Messenger account might sound like a dramatic breakup, but it’s actually quite a straightforward process. So, don’t worry, we won’t ask you to send a breakup text to Messenger!
Now, let’s get real. We all love Messenger, right? It’s like our digital lifeline for chatting with friends, family, and that random person from your high school you haven’t seen in ages. But sometimes, life throws privacy concerns or the need to cut down on social media our way. That’s when the Deactivate button becomes your best friend.
Whether you want a temporary breather or you’re ready to go full-on digital detox by permanently deleting your Messenger account, we’ve got your back. We’re going to walk you through all the steps to ensure you gracefully exit the Messenger party.
Don’t worry; this isn’t rocket science. You can totally do this without any IT support. And if you’re only taking a Messenger vacation, you can always return to the party later.
So, let’s dive in and master the art of Messenger deactivation together!
Is it possible to deactivate Facebook Messenger without deleting Facebook?
Since Facebook Messenger is closely linked to the main Facebook platform, many of us have our Messenger accounts connected to our primary Facebook accounts. If that’s the case, you cannot deactivate Messenger without also deleting your Facebook account. However, if your Messenger account exists independently and isn’t linked to a primary Facebook account, you can deactivate it without affecting your Facebook account by following the previously mentioned steps.
But, there is an alternative solution.
How to Deactivate Personal Facebook Messenger?
Your personal Messenger account and your Facebook account are now tightly connected. To deactivate your Messenger account, you’ll need to deactivate your main Facebook account first. You can do this by going to the “account settings” in your Facebook account and then following the same process within the Messenger app.
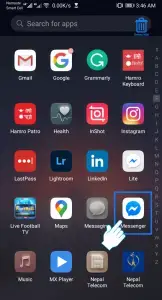
On Android
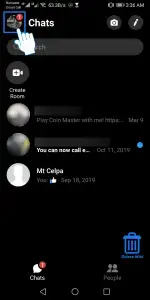
1. Launch the Messenger app on your smartphone.
2. Tap on your profile in the upper left corner of your screen.
3. Scroll to the bottom and select Legal & Policies.

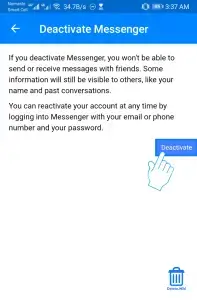
4. Now, click on Deactivate Messenger.

5. Choose the Deactivate button.
On IOS (iPhone or iPad)
1. Open the Messenger app on your device.![]()
2. Tap on your profile located at the top left corner.
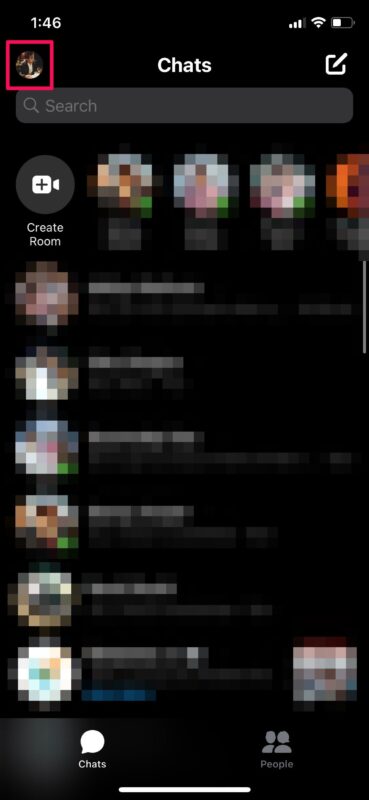
3. Choose Account Settings.
4. Under Your Facebook Information, tap on Delete Your Account and Information
5. Now, select Deactivate
6. Enter your password.
7. Tap Submit to complete the process.
Note: You can reactivate Messenger anytime by logging into the Messenger app. Reactivating Messenger does not reactivate your Facebook account.
How to Deactivate Facebook Business Messenger?
Deactivating your Facebook Messenger is a straightforward process that only takes a few minutes when you follow these steps:
1. Log in as an Admin
To deactivate Facebook Messenger, you need to be logged in as an Admin. If you already have admin privileges, simply log into your existing account. If not, ask the existing Page Admin to grant you Administrator permissions so you can proceed with deactivation.
2. Access “Settings”
Once you’re logged in as an Admin, you’ll find the Settings option at the top of the page, situated next to the Help tab. Click on Settings to reveal additional options.
3. Navigate to “General”
Within your Settings, you’ll see a menu where you can select General. Click on General to proceed.
4. Locate “Messages”
In the General section, you’ll find the Messages option. Click on it to access the settings related to your Page’s Facebook Messenger.
5. Uncheck “Allow people to contact my Page privately by showing the Message button”
If Messenger is currently enabled, you’ll notice that the option that reads Allow people to contact my Page privately by showing the Message button has a checkmark next to it. To deactivate Messenger, uncheck this option.
6. Save Your Changes
Finally, click on Save Changes. This action will officially deactivate Facebook Messenger for your Page. That’s it – a simple and hassle-free process!
Is deactivating Messenger a good idea?
Pros:
- Enhanced Privacy: When you deactivate Messenger, you’re taking a step towards better privacy. Your personal information becomes less exposed, which means there are fewer worries about who might access or misuse your data.
- Time for Other Things: Deactivation also gives you more time for activities beyond social media. You won’t find yourself constantly checking messages, so you can free up valuable hours for hobbies, work, or spending time with loved ones.
- Take Control of Your Data: With Messenger deactivated, you gain better control over your personal data. You get to decide who can access it, making your online life more secure and private.
- Ethical Choice: You’re not actively supporting a company that might profit from using your data in ways you’re not comfortable with. It’s a step towards aligning your online choices with your values.
- Reduced Stress: Deactivating Messenger can lead to less digital stress. You create a bit more space for a relaxed online experience, reducing the pressure of always being connected and available.
Cons:
- Feeling Out of the Loop: Without Facebook’s newsfeed, you might miss out on updates and posts from your friends and network, which can make you feel disconnected from what’s happening in their lives.
- Losing Touch: Deactivating Messenger can also mean losing touch with some friends and family members who rely on it for communication. It’s important to think about who you want to stay connected with.
- Full Facebook Deactivation: Keep in mind that to deactivate Messenger, you might have to deactivate your entire Facebook account. This is a more significant step and worth considering carefully.
- Business Opportunities: If you use Messenger for business or marketing purposes, deactivating it could mean missing out on opportunities to reach your audience and potential customers. So, think about the impact on your professional life as well.
Are you struggling to deactivate Facebook Messenger?
If you’ve attempted to deactivate Messenger and you’re still receiving unwanted messages, here are some steps to help you out.
First and foremost, ensure that you followed the deactivation process precisely as outlined earlier. Any deviations from the provided steps might prevent you from successfully deactivating Messenger.
Once you’ve confirmed your steps, double-check that you’re logged in as an admin. It’s essential to be the Page’s administrator to modify Messenger preferences for a Business Page.
If you’re still encountering difficulties, it’s possible that your Page might be set up as a regular Facebook account rather than a Business Page. In such cases, it’s a good idea to contact Facebook for guidance on transitioning your Page to a Business Page. Once that’s sorted, you can proceed with the Messenger deactivation steps.
What occurs when you deactivate Messenger?
Now that you’ve learned how to deactivate Facebook Messenger, remember that no one can see your profile or send messages in your existing chats. However, if you reactivate Messenger, it’ll also reactivate your primary Facebook account. If you wish to keep only Messenger, you’ll need to deactivate your Facebook account once more.
Keep in mind, though, that if you completely delete your Facebook account, you’ll lose access to Messenger. Unfortunately, there’s no way to use Messenger without an active Facebook profile.
Final words
Deactivating your Messenger account is a personal decision, and it’s crucial to understand the outcomes beforehand. While deactivation can enhance your privacy, it also means giving up access to social interactions.
If you decide on permanent deletion, be sure to download your information and content first to prevent permanent loss of access. If you’re aware of alternative methods for handling this situation, feel free to share your insights with us!