Sometimes, our social media inboxes can become a little overwhelming, filled with messages from people we might not know well or wish to screen before engaging. Whether it’s an unfamiliar friend request on Facebook or a follower on Instagram whose messages you prefer to review first, knowing how to manage these interactions can make your social media experience much smoother. In this guide, we’ll show you how to put someone to Message Requests on both Facebook and Instagram.
This simple process helps you control your privacy and keeps your main inbox clear, allowing you to focus on the messages that matter most. Read on to learn how to neatly organize your social media chats and tailor your messaging experience to suit your needs.
How to Limit Someone’s Access on Instagram?
If you’ve accidentally accepted someone’s message request or prefer not to receive messages from them without resorting to blocking, you can restrict the user to return them to the Message Requests folder. Here’s how:
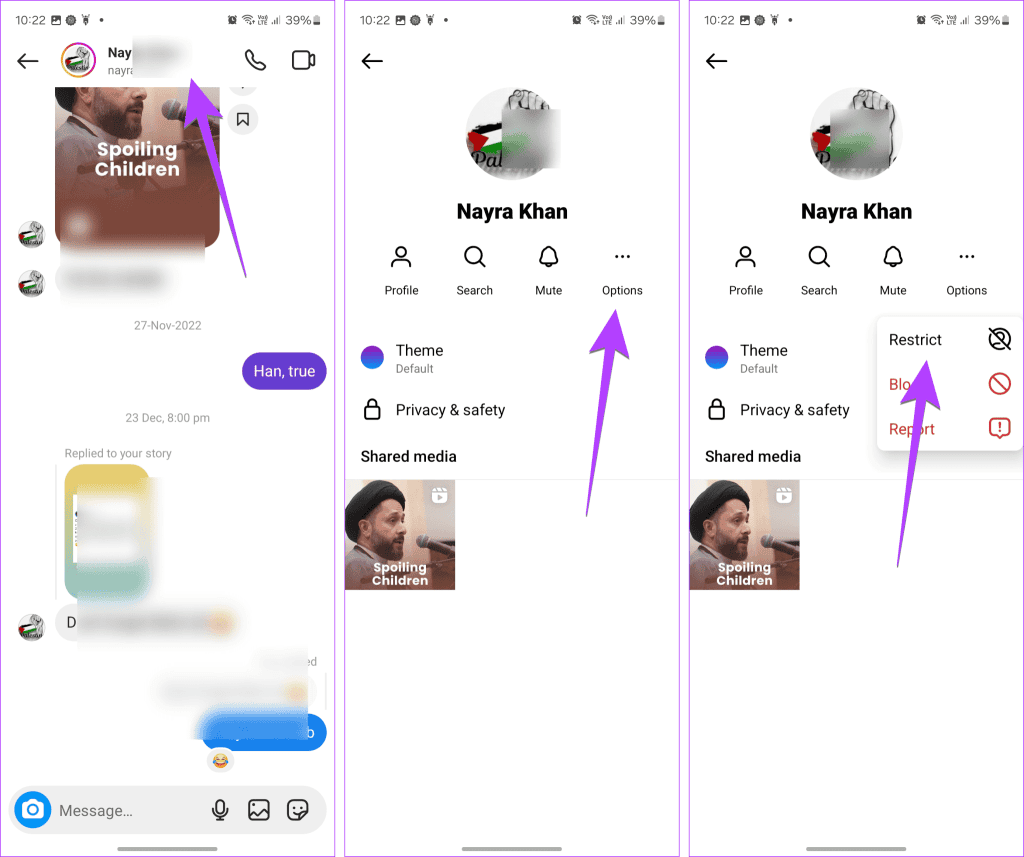
#1: Open the chat with the user and tap on their name at the top.
#2: Tap the three-dot icon, then select Restrict.

Keep in mind that the profile will be restricted immediately. When you restrict someone on Instagram, the following changes occur:
– Messages are moved to the Message Requests folder, and you won’t receive notifications for new messages. You can view new messages by checking the Message Requests folder.
– The restricted user cannot see your online status or whether you’ve read their messages.
– Their comments on your posts are only visible to them. You can choose to approve their comments for others to see.
– You won’t be notified about new comments from the restricted user.
– The other person won’t be notified that you’ve restricted them.
– You can unrestrict the profile at any time by going to the user’s profile, tapping the three-dot icon, and selecting Unrestrict. Alternatively, you can access the Restricted list from your profile settings and unrestrict the profile from there.
– Once unrestricted, the chat will appear in your normal chats list.
Tip: You can also restrict someone directly from their profile by tapping the three-dot icon and selecting Restrict.
How to Put Someone to Message Requests on Facebook and Instagram?
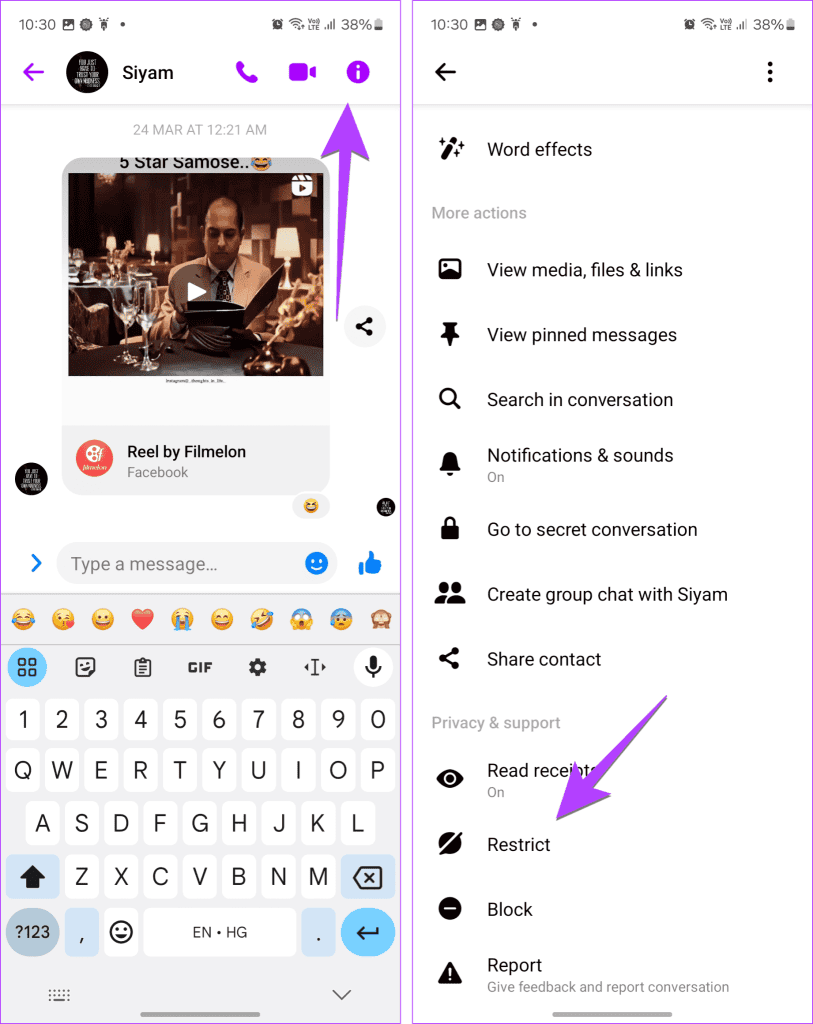
#1: In Facebook Messenger, navigate to the chat and tap on the “i” icon located at the top. Alternatively, tap on the person’s name at the top of the chat.
#2: Scroll down and select Restrict.

After restricting a user on Messenger, the following changes occur:
– The message thread will disappear from your chats list.
– You won’t receive notifications for new messages or calls from the restricted user.
– You cannot send messages to the restricted user.
– The restricted user will not be notified about being restricted, and they cannot see your online status.
To unrestrict the user:
1. Tap the three-bar icon in the Messenger app and select the Settings icon.
2. Go to Privacy and Safety then choose Restricted accounts to view all restricted users.
3. Select the desired user and tap on the “i” icon, then select Unrestrict.
To view messages from a restricted user:
1. Navigate to the Restricted accounts screen as described above.
2. Select the user to view their messages. The other user will not be notified that you’re reading their messages.
Conclusion
In conclusion, managing who can send you direct messages on Facebook and Instagram by moving unwanted or unfamiliar contacts to message requests is a simple yet powerful way to maintain your privacy and organize your social interactions. Whether you’re looking to minimize distractions, protect your digital space, or just keep your social feeds tidy, understanding how to filter your message requests is an essential skill in today’s digital age. With the steps outlined above, you can ensure that you only engage with messages that are meaningful and important to you, keeping the rest at a manageable distance until you decide they’re worth your attention.

