
How to create beautiful photos on Instagram to gain more followers? Here are some Instagram tips for Photo and video sharing…
Instagram tips for photo and video sharing
1. Create your captions more readable with line breaks
When you favor the long-form caption a la National Geographic, this tip will make your posts more readable.
How you can do it:
- Edit your picture and proceed to the caption screen
- Write your caption
- To access the Return key, choose the 123 key in your system’s keyboard
- Use Return to add breaks to your caption
Note: The breaks will begin a new line, however, not make the white space that you’d see between 2 pictures. If you would like a paragraph break, write out your caption in a note app and copy it to Instagram. To break up lines further, think about using punctuation like bullet points or dashes, to hold the place of an empty line.
2. Schedule Instagram posts
Too busy to update at a time when your fans are online on Instagram? Use Hootsuite to schedule photos direct to Instagram.
How you can do it:
Note: Take a look at the guide to scheduling posts on Instagram to discover ways to do that from a personal account.
3. Use individual pictures to make a bigger one
Get creative and have enjoyable with Instagram’s grid format is one of the great Instagram tips for photo and video sharing.
How you can do it:
- To share a #triplegram, easy share three related photos consecutively so that they take up an entire line with a single unified look
- To share a grid publish series, attempt cropping a single picture into 9 (apps like these could make the process simple) and share them in fast succession

For a closer look at how brands have created good use of the grid layout, take a look at 6 Lessons Brands Could Learn from the Most Creative Accounts on Instagram.
4. Adjust the intensity of filters
For those who need something close to—however, not quite—the #nofilter look.
How you can do it:
- After importing or taking an image, choose the filter you would like to use
- Select the filter again to open edit options
- Utilize the sliding scale to adjust the intensity of the filter
- Choose Done to add the filter to your publish and continue your edits
5. Add or capture a post with multiple scenes
It is an Instagram Story that never disappears!
How you can add a post with multiple images and video clips:
- Choose the + icon in the navigation bar at the bottom of the screen
- Choose SELECT MULTIPLE on the Library tab
- Select the images and videos from your camera roll which you need to embody in your Story
- Select and edit your filters (you could select a different filter for each picture or video or make it consistent across the entire publish)
- When you have chosen your videos, you could tap to trim them or press and keep to reorder
- To delete a clip, drag it to the center of the screen
- Complete your edits as normal and share your masterpiece
How you can record a video with multiple clips:
- Choose the + icon at the end of the screen
- Select Video
- Select the circle icon to start recording
- To take multiple clips, lift your finger off the circle icon to pause, then press and keep it if you want to start recording again
- To delete a previous clip in your video, choose Delete, then tap again to confirm
6. Share videos without sound
If the audio is bad and/or does not include the viewing experience, you might as well remove so it isn’t a distraction.
How you can do it:
- Choose the + icon at the bottom of the screen to pick the video you would like to add
- Select Next
- Choose the volume control icon at the upper of the screen to turn off the video’s sound
Note: This could also be finished in Instagram Stories. After recording a video, merely tap the volume control icon at the high of the screen to turn off.
7. Save drafts for later
You have snapped the great shot and edited it to perfection, however, the great caption eludes you. Save the post as a draft—with all of your edits intact—and come back to it later.
How you can do it:
- Choose the + icon at the bottom of the screen to shoot or add a picture or video
- Edit the post as you want, including filters, captions, tags, or a location
- Hit the < icon in the higher left corner of the screen to return to the editing screen
- Hit the < icon again
- A pop-up menu will appear, choose Save Draft
- Once you are ready to continue with your edits and share your post, Select the + icon, then choose Library
- A new DRAFTS part will now appear above CAMERA ROLL
- Choose your desired post, or choose Manage to view all your saved drafts
- Choose a post, edit, and share as normal
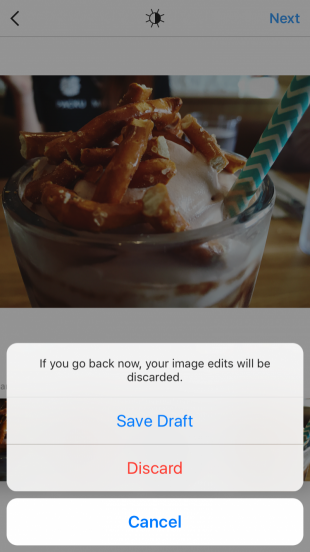
Note: To delete a post from your saved posts, choose Manage to go to Drafts, then choose Edit. Choose the posts you would like to get rid of and select Discard Posts at the bottom of the screen, then choose one more time to confirm.
8. Blur the background on a portrait picture
How you can do it:
- Visit the camera and choose Focus among the options below the record button
- Take a selfie or switch to the rear-facing camera to snap a picture of someone else
- The topic will stay in focus while the background blurs
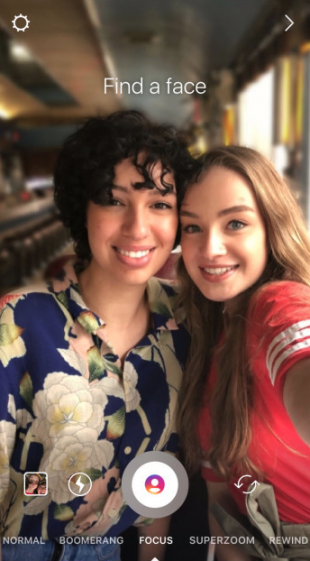
Note: this function is just available to choose Android devices, iPhone SE, 6S, 6S+, 7, 7+, 8, 8+, and X.
9. Request to join another user’s Live video (or encourage followers to join yours)
Brands could use this function when partnering with other companies or influencers for announcements, Instagram takeovers, and the like. Or, encourage your fans to join a live Q&A you are hosting.
How you can request to join a live video:
- When watching a live video, Choose Request in the comments part
- You will see a confirmation when the user accepts and you will have a moment to prepare
- When you are live, the screen will split in half
- You could leave the live video at any time
How you can accept a request from a follower to join your live video:
- When hosting your own live video, you will see a noti for each request in the comments section
- Choose View and then select to add the requestor or cancel the request
- The icon with two smiley faces will have a red number displaying how many requests you have
- Select the icon, and you will see both requests and current viewers
- You could either accept a request or invite any user to join you. You could remove a visitor and add someone else at any time
10. Save your live video
How you can do it:
- After your live broadcast ends, Choose Save in the top right corner
- After saving, Select Done and your live video shall be saved to your camera roll, however, will no longer be available in the app
We hope 10 Instagram tips for Photo and video sharing will help your Instagram brand.