
Welcome to the heart of your music creation journey—the FL Studio Mixer. Dive into a world where every fader, knob, and tool is your brush for crafting the perfect sonic masterpiece. Whether you’re sculpting basslines or refining ambient textures, the FL Studio Mixer is your canvas for creative expression.
Join us as we explore the techniques, plugins, and strategies that will elevate your mixes, making your music stand out and resonate with listeners for years to come. Let’s unlock the full potential of the FL Studio Mixer together!
Table of Contents
ToggleGetting Started with the FL Studio Mixer
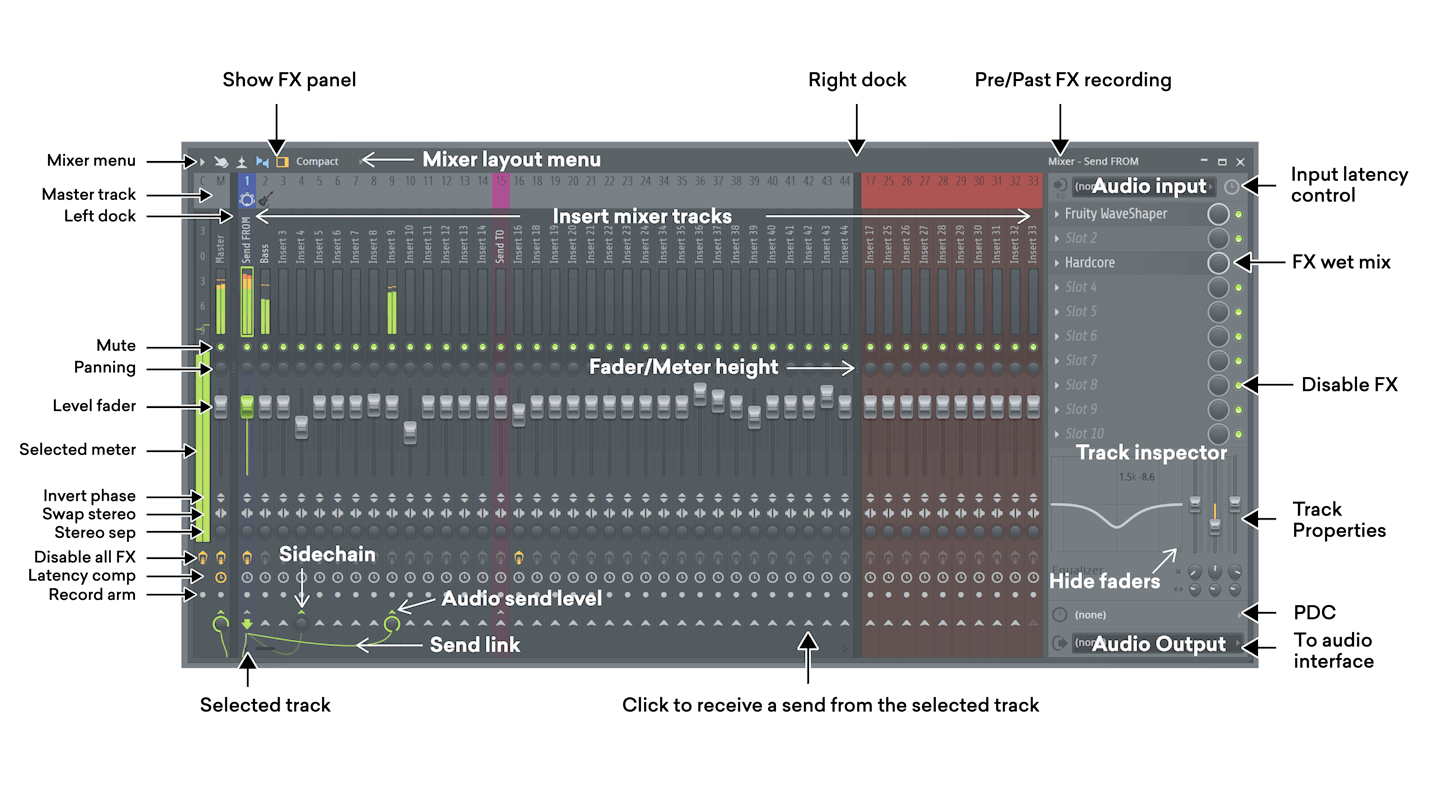
When you open the FL Studio Mixer, you’ll find channels that work like mixing lanes. Each channel has a volume slider, a panning dial, and places for effects.
In FL Studio, you need to manually send sounds from the channel rack to the mixer.
To mix instrument audio, assign each channel slot to a mixer track. You can do this from the channel rack or use Ctrl/Cmd L for automatic routing. After routing, you can use different functions on each channel strip in the FL Studio Mixer.
Flip Phase: This changes the waveform’s phase, fixing issues where the bass sounds weak due to multiple microphones or misaligned samples.
Switch Channels: This swaps the left and right stereo channels to correct misalignments in recorded channels or to sync audio with visual elements like video.

- FX Master Switch
A big button that turns on or off all the sound effects for a track at once. Click left to change, and click right to open or close all the effect settings.
- Track Delay
It’s like a time delay that helps align sounds that were delayed by special effects. The colors show what type of delay it is.
- Recording Arm Switch
It gets the track ready to record, so it can capture sounds from inside or outside. You can even give names to the recorded files.
- Send/Sidechain Switch
Handles send sounds to other places or control how they mix together.
- Routing Knob
Sends sound from one track to another. Right-click for extra options, like sending without going to the main mix. Use the knob to control how loud the received sound is.
- Peak Meters
Shows how loud in dB. Usually, it’s hard to make it too loud, but be careful with the Master track or ASIO output.
- Mute Switch
Silences or isolates a track. Handy shortcuts: mute/unmute all or keep a track quiet.
- Panning
Moves sound between left and right. The default is ‘Circular Panning Law.’
- Level Faders
Adjusts volume after applying effects. Make automation clips or connect to external controllers.
Stereo Separation

It makes it sound wider or narrower. Works on stereo tracks.
- Audio Input and Output
Picks hardware inputs and outputs from the audio interface. Choose to record before or after effects.
These settings give you full control over recording, processing, and output in FL Studio’s mixer, providing detailed and nuanced mixing abilities.
Setting Up Your Project for the First Mix
Get organized for mixing
First, name and color your mixer channels to match your instruments or sounds. This makes everything easier later on.
Make sure each instrument has its own mixer channel. This helps keep things clear when you’re mixing.
To do this, right-click in the channel rack and choose ‘route to this track.’ This creates a direct path from your sound to the mixer.
How channels and routing work in the FL Studio Mixer
Flexible and powerful routing in FL Studio:
In FL Studio, the routing is both flexible and powerful. Most of your time mixing individual sounds will be spent in the workhorse known as Insert Channels.
In FL Studio’s mixer, there are Insert Channels, your go-to for mixing individual sounds. Then, Send Channels come into play, letting you route multiple inserts to a single effects channel—perfect for a uniform reverb or delay.
The Master Channel is the convergence point for all these individual paths before your mix goes public. Managing levels and effects here is crucial, impacting the entire mix.
Understanding this signal flow, from Channel Rack to Insert Channels, through effects, and out to the Master Channel, makes you the conductor—ensuring clarity, depth, and power in your final mix.
Mixing essentials and creative techniques in FL Studio
At the core of FL Studio’s mixer, find the key to a robust mix—balance and creativity.
Start by leveling each instrument, ensuring a harmonious blend without overpowering elements.
Next, wield the EQ tool, crafting the sonic space and ensuring each instrument finds its perfect place in the mix.