Sharing moments through Instagram Stories is a fantastic way to connect with your audience and show a bit of your creativity. One of the coolest things you can do now is layering pictures, letting you blend multiple images into one amazing story. Instagram’s recent updates make this even easier and more fun. In this guide, I’ll walk you through how to layer pictures in your Instagram Story using the latest features, like the super simple drag-and-drop interface, fun new sticker options, and improved photo editing tools.
Let’s dive in and get your Stories looking more engaging and eye-catching than ever!
How to Layer Pictures in Your Instagram Story?
1. Using the Gallery Stickers
The Instagram Gallery sticker allows users to overlay a full image on top of another image, enabling the layering of multiple images within an Instagram story. Here’s how to use it:
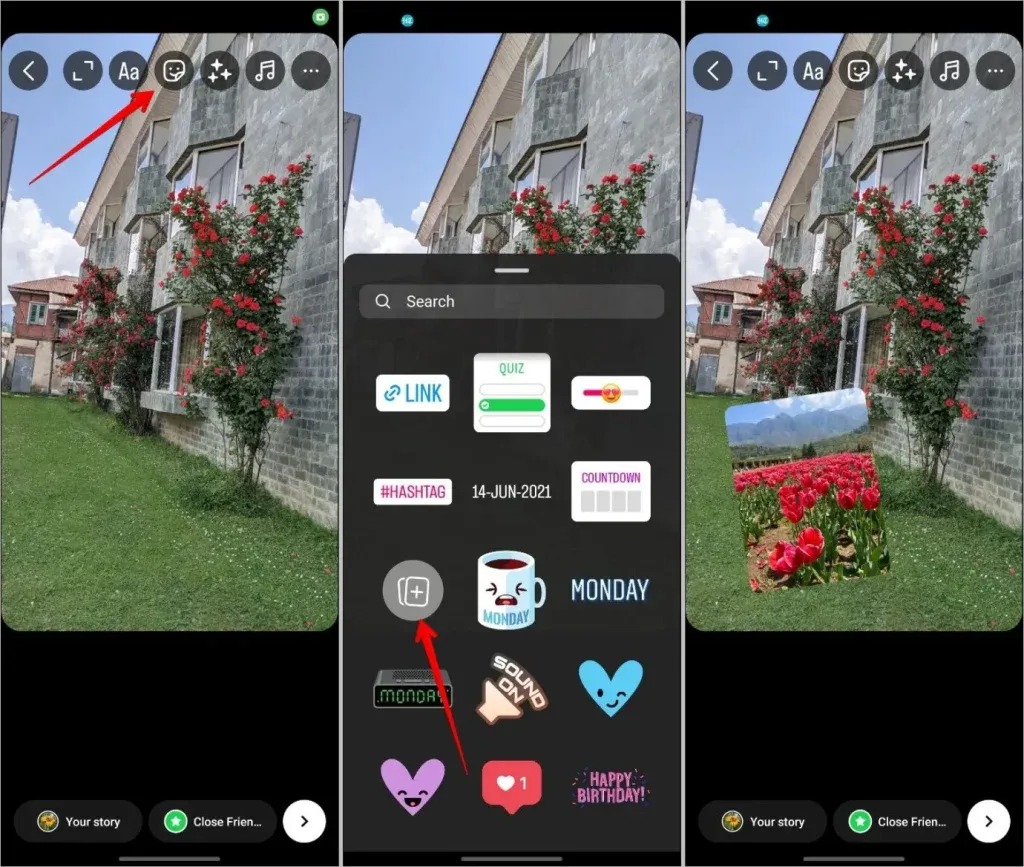
1. Choose the background picture for your Instagram story within the Instagram app.
2. While editing your story, tap on the Sticker icon at the top of the screen.
3. Select the Gallery sticker (displayed as a plus sign in a rectangle box on Android or as the image thumbnail on iPhone).
4. Choose the picture you want to add and tap on it to cycle through different shapes, such as circle, triangle, square, heart, and full image. You can overlay multiple pictures in a single Instagram story.
5. Once you’re satisfied with the layout, you can publish the story or download the picture to your phone by tapping the three-dot icon and selecting Save.
2. Try Cutout Sticker
If you aim to overlay only a specific portion of one picture onto another on Instagram, the Cutout sticker is your tool of choice. Keep in mind that this method is effective when there’s a distinct subject in the image.
Here’s how to use it:
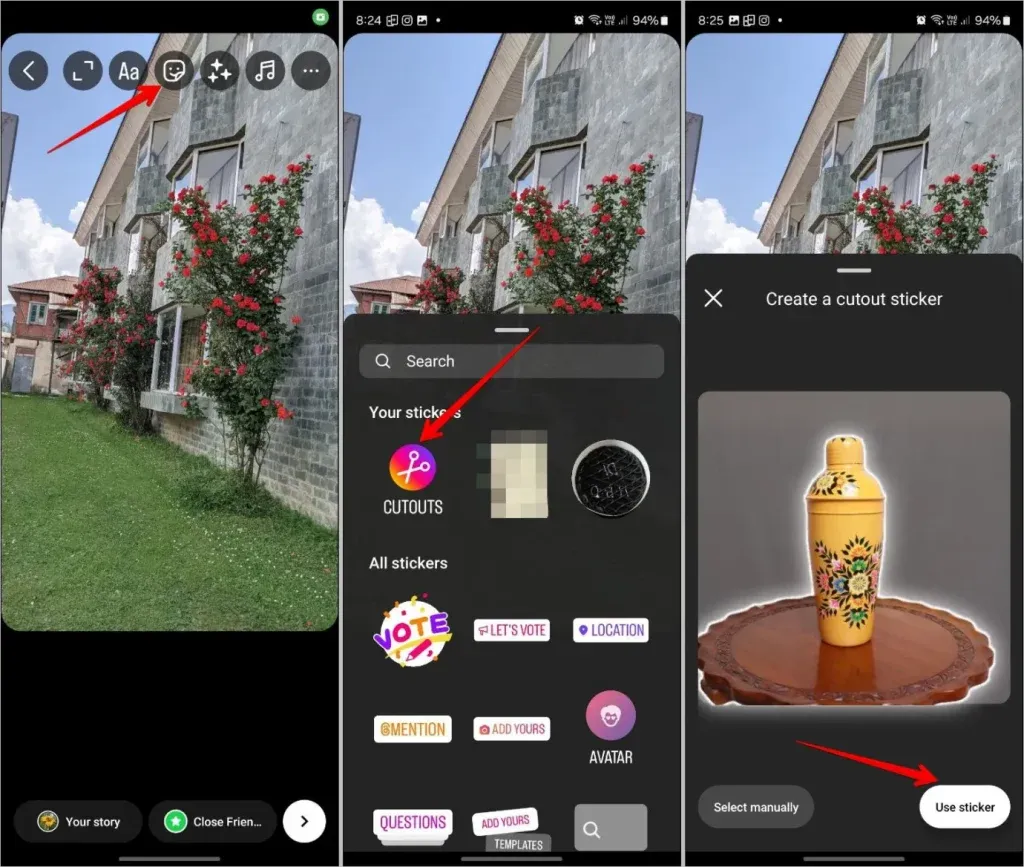
1. Add the background picture to your Instagram story.
2. When you’re on the story edit screen, tap on the Sticker icon and select the Cutouts sticker.
3. Instagram will automatically identify the object and generate its cutout. If automatic detection fails, manually tap on the subject. Then, hit the Use Sticker button once you’re satisfied with the sticker’s preview.
Here are a few tips:
– You can use both the Gallery and Cutout stickers on a single image.
– Cutout stickers created for one story can be reused on other images.
– You can also create cutout stickers from some Instagram posts. Simply tap on the three-dot icon above the post and select Create a cutout sticker. The sticker will be saved in the sticker gallery for use in any story.
– Cutout stickers are synchronized across your devices. For instance, if you create a cutout sticker on an Android phone, it will also appear in your Instagram account on your iPhone.
Final thoughts
Layering pictures in your Instagram Story is a fantastic way to bring your content to life and connect with your audience on a deeper level. By using these tips, you can add a personal touch that truly reflects your style and creativity. Don’t worry if it takes a few tries to get it just right—experimenting is all part of the fun! Play around with different layouts, filters, and stickers to see what resonates with you. Enjoy the process, and watch your Instagram Stories become a vibrant expression of your unique perspective. Happy creating!