Although not a newcomer to social media, YouTube remains a trusted and essential platform. As video continues to gain importance and popularity in the social media world, establishing a YouTube marketing strategy can yield significant benefits. With over 2 billion active monthly users and being the second-largest search engine in the world, YouTube is an excellent platform to connect with new audiences, increase brand awareness, and more. If you’re considering starting a YouTube channel but haven’t yet taken the leap, this is the perfect opportunity to get started. With this step-by-step guide, you can create a Youtube channel for your brand in just a few minutes. Whether you’re a beginner or need a refresher, feel free to skip to the section that is most relevant to you.
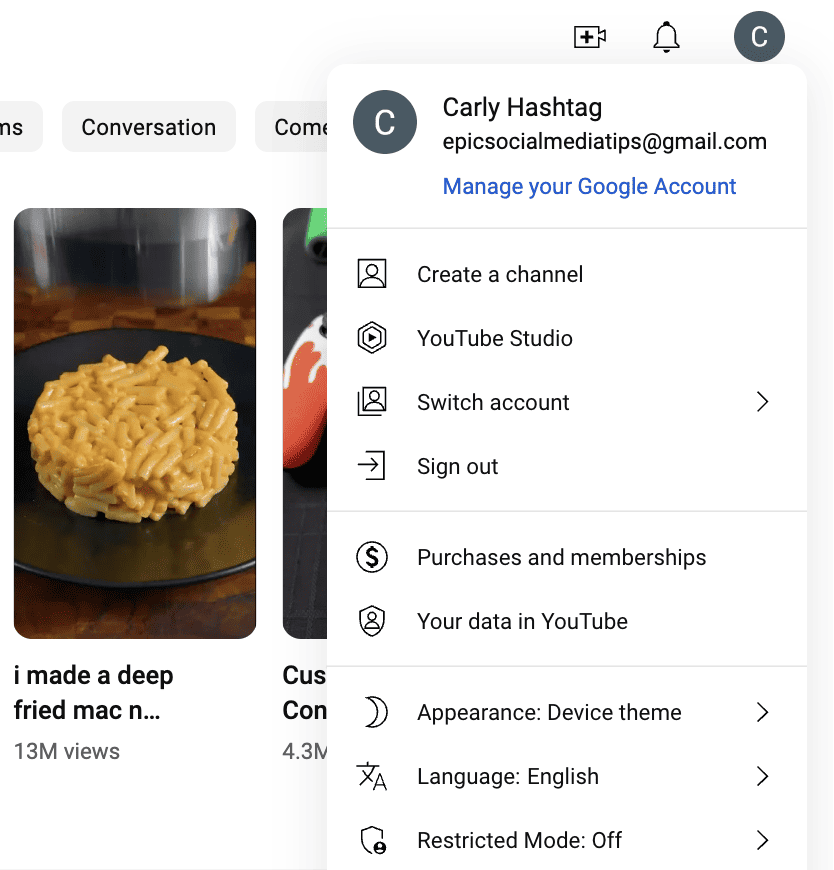
To begin, make sure you’re signed in to Google. If you have a Google account you’d like to use, simply sign in. However, I suggest creating a new account specifically for your YouTube channel. This will allow you to share it with others and keep your personal account separate. To create a Google account, head over to YouTube and click Sign in.
2. Create your YouTube channel
Next, go to YouTube’s homepage and click the avatar icon in the top right corner. Then, select Create a Channel from the drop-down menu. Now you need to give a name to your channel. You can stop here or create a second channel for your brand. To do this, go to your Settings, click Create a new channel, and follow the prompts. If you want to make your account extra secure, set up two-step verification by going to your Google Account > Security > 2-Step Verification > Getting Start.
And that’s it! You have created and secured your account. Now, it’s time to have some fun creating content for your brand-new YouTube channel.
3. Customize your channel layout
Let’s move on to the fun part: customizing your channel’s layout! To get started, simply click the “Customize my channel” button at the top of the screen. This will take you to the YouTube studio where you’ll find options for customizing your channel, including Layout, Branding, and Basic Info.
First up, let’s start with Layout. This allows you to organize your content and choose what people see first. Here are the different elements you can customize:
Video spotlights: This is the first piece of content that appears on your channel. There are two types you can add: a channel trailer, which plays for people who haven’t subscribed to your channel, and a featured video, which plays for your subscribers who haven’t seen it yet.
Featured sections: Choose up to 12 featured sections that will appear on your channel. These organize the content your visitors see first. The default includes a Short Videos section and a Videos section, but you can click the + Add Section button to choose from more.
The playlists and sections you choose will depend on how you use your channel. If you go Live often, adding the “Live Now,” “Past Livestreams,” and “Upcoming Livestreams” sections would be great. Once you’ve customized your layout, hit the Publish button in the upper right corner. Or, if you’re not finished yet, you can move on to the next step: Branding.
Pro tip: If you don’t plan on uploading frequently, choosing the Feature Channels section can make your channel look more active. This also positions you as an industry leader and shows love to fellow YouTube creators.
4. Decorate your channel
To make your channel look even more polished, it’s time to customize your channel’s branding. There are three visual elements you can adjust: your profile picture, banner image, and video watermark. Your profile picture appears on your channel, next to your videos, and in the comments you write. Your banner image is the large graphic at the top of your YouTube channel, and your video watermark appears in the bottom right corner of your videos.
To ensure a consistent look, it’s best to use your brand’s colors, designs, and shapes across all visual elements. You can use resources like Canva to quickly create properly-sized images with YouTube templates. Before creating images, confirm the dimensions for YouTube images:
Profile picture: 800 x 800 px
Channel banner: At least 2048 x 1152 px, but the safe area for mobile and web without cropping is 1546 x 423 px
YouTube will show you a preview so you can see if anything is getting cropped out on various views. Remember, there’s no one-size-fits-all approach to YouTube branding, so pick visuals that best reflect your brand!
5. Update your channel basic info
Let’s talk about customizing your channel’s basic info! This is a crucial step in making a lasting impression on your viewers, and it can help funnel traffic to your website and other social channels. Let’s go over each piece of basic channel information you can adjust:
First up, your name! Make sure it accurately represents your channel, brand, or you. You should also create a memorable handle that’s easy to search and will appear in your public URL.
Your description is also important, as it’s a chance to show off your personality and what makes your channel unique. Use up to 1,000 characters to describe your content, and include popular search keywords relevant to your channel and content. You can also add versions of your description in multiple languages.
Don’t forget to include links to your website and social channels! You can even choose up to five links to appear in the lower right corner of your banner. Just be careful that these links don’t cover important information or text in your cover image graphic.
Lastly, include a public-facing email where people can contact you for business or press inquiries. Once you’ve customized all of these elements, hit publish, and congratulations! Your channel is officially set up, and you’re ready to start adding videos.
Ready to put your knowledge to the test?
Learning how to create a YouTube channel is just the beginning. Mastering YouTube takes effort and time.
By following the tips outlined in this guide, your channel will be up and running in no time. Once you’ve created your channel and uploaded your videos, it’s time to get the word out there. Check out our other article on how to promote your YouTube channel for helpful tips to increase your views and reach more people. Good luck!