Making people interested in your event can be both fun and a bit tricky. You want lots of people to show up, so it’s important to let the right people know about it using the best ways. Luckily, on social media sites like Facebook, there are tools to help you promote your event and get more people to join. This guide will show you step-by-step how to make an event on Facebook and why it’s a good thing to do. We’ll also give you some extra tips on how to make your Facebook event better. Let’s start and learn how to create an event on Facebook.
What exactly is Facebook Events?
Facebook Events is a handy tool for setting up and managing events with their own special pages on Facebook. Whether it’s an in-person gathering or a virtual meetup, you can use this tool to share all the important info and invite people. The event’s page is like a home base where people can learn about what the event is, when and where it’s going down, how to join, who’s going to be there, and more.
You can even make the event page look cool by adding interesting pictures. If you use it smartly, Facebook Events can be a great way to spread the word about your event and get more people interested in joining.
4 Advantages of Creating a Facebook Event
Enhance Event Information Accessibility
First off, you’re putting all the important stuff about your event in one spot. This makes it easy for anyone who wants to know more. Whether they’re checking the time or figuring out how to join, all the info is right there. This makes it simpler for people, and they’re more likely to join the event and keep an eye out for future ones.
Boost Event Visibility
Because Facebook is the biggest social network, making Events there can really make more people notice your event. According to the latest stats, around 2.9 billion people actively use Facebook every month. So, in theory, your event could potentially reach billions of people. While that might be a big stretch, it does mean you have the chance to promote your event to a huge audience.
When people share the event on their Timelines, it makes it more likely that even more people will see it. And if the regular ways don’t work, you can also use paid Facebook ads to make sure more people know about your event. This extra visibility is just what you need to get more people to come to your event.
Promote Your Event Easily
Facebook simplifies the process for event organizers to share their events with a larger audience effortlessly. Additionally, they can send invites directly to specific users, ensuring that the right people see and attend the event. This makes it straightforward to promote the event and reach your target audience, increasing attendance.
Creating Interest Through Constant Reminders
A great feature of Facebook Events is the automatic reminders that pop up in people’s Feeds. When someone interacts with the Event, it shows up again in the News Feeds of their friends or followers. This helps create interest and grabs attention for your Event. Even for those who’ve already said they’re coming, these regular reminders help them remember to attend.
How to Create an Event on Facebook?
On Facebook, you can choose to make an Event either from your personal profile or your Business Facebook Page. Additionally, you have the flexibility to create public or private Events based on the audience you’re aiming for. Let’s go through the steps for creating an Event on Facebook, covering all these various options.
Create an Event from a Personal Facebook Account
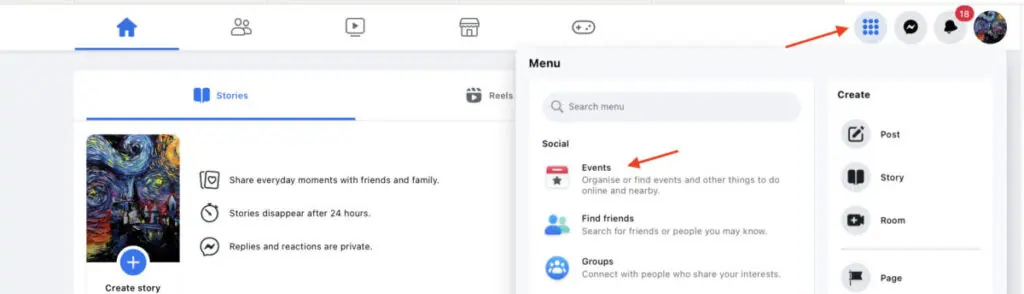
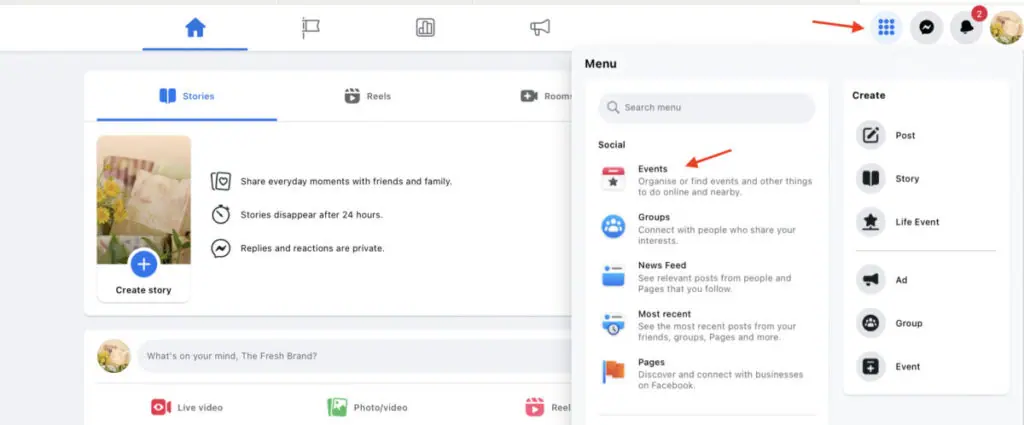
1. Sign in to your personal Facebook profile and click the menu button located in the top-right corner of the screen. Next, choose Events from the drop-down menu.
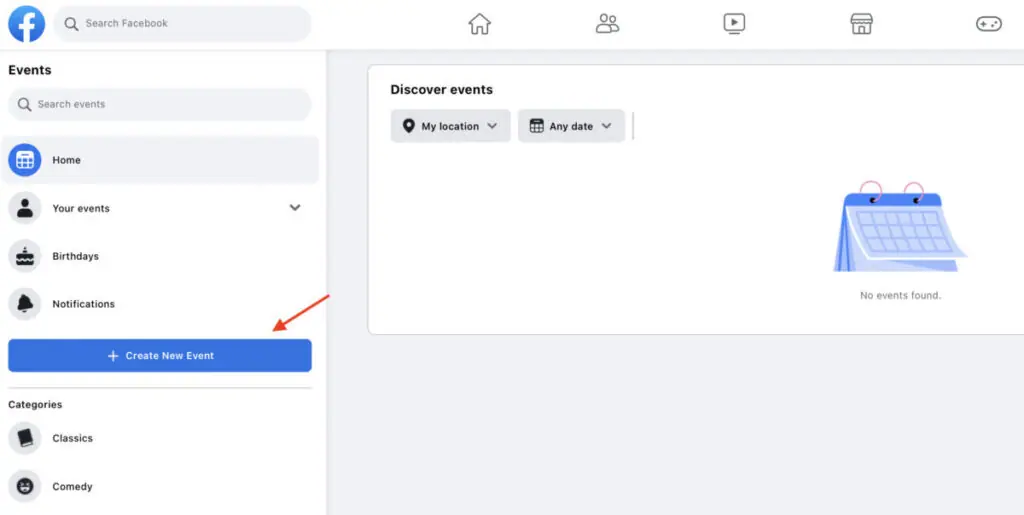
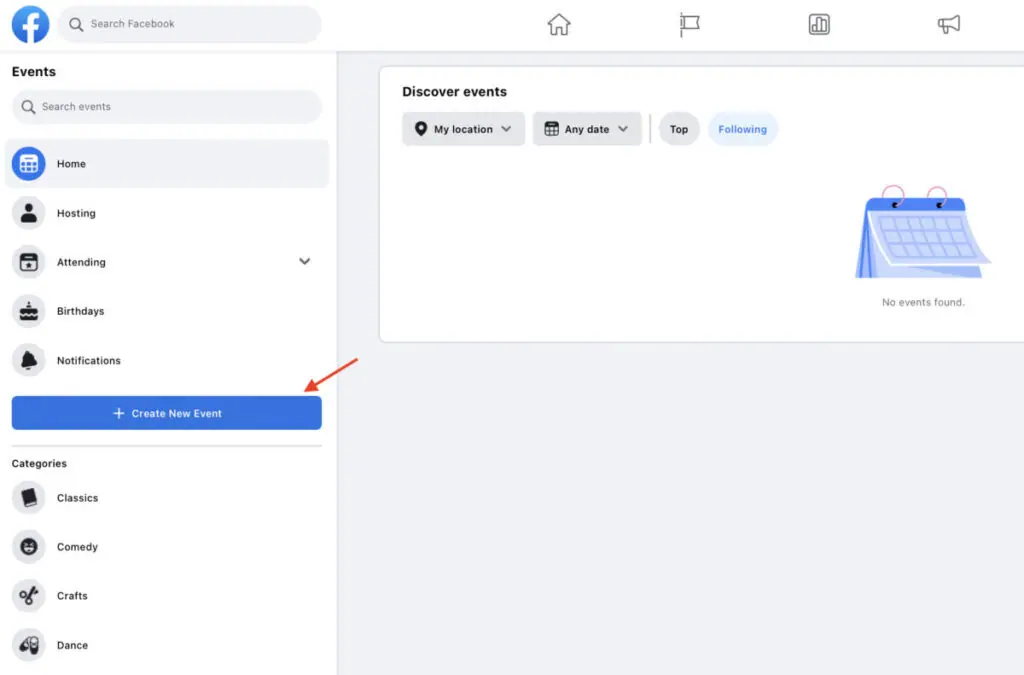
2. You’ll be directed to a page where you can explore events happening online or nearby. You can filter the results by category, like Comedy, Dance, Games, and more. Click the Create New Event button on the left-hand panel.
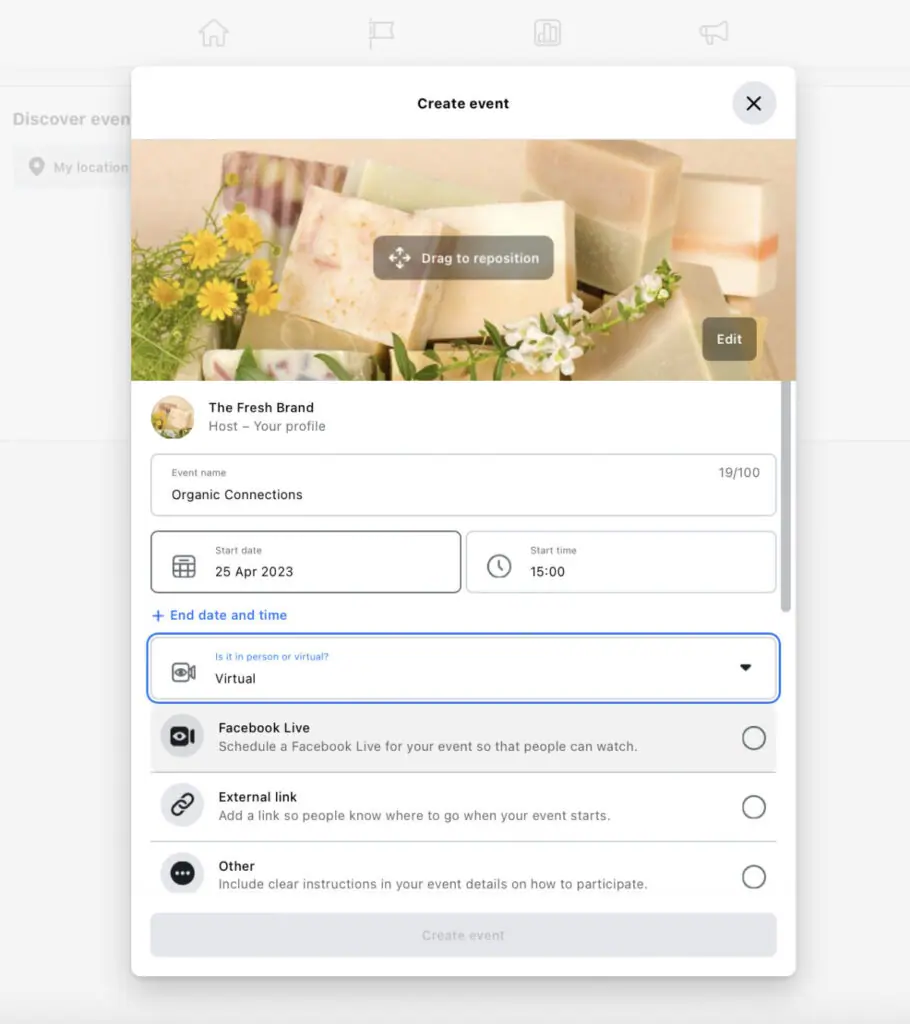
3. In the next phase, you can share information about the event. Begin by giving it a name and selecting the date and time. Don’t forget to upload an attention-grabbing event cover photo that relates to the topic or theme, usually a unique graphic designed specifically for the event.
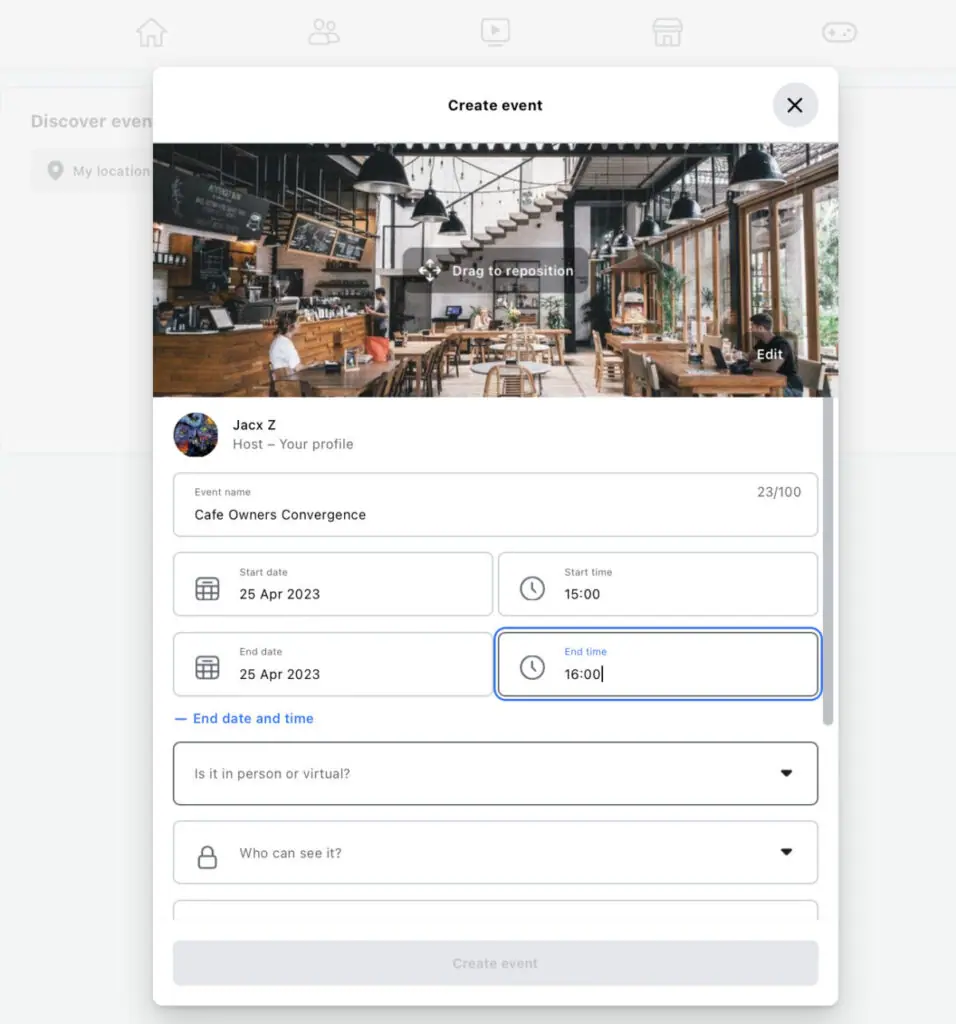
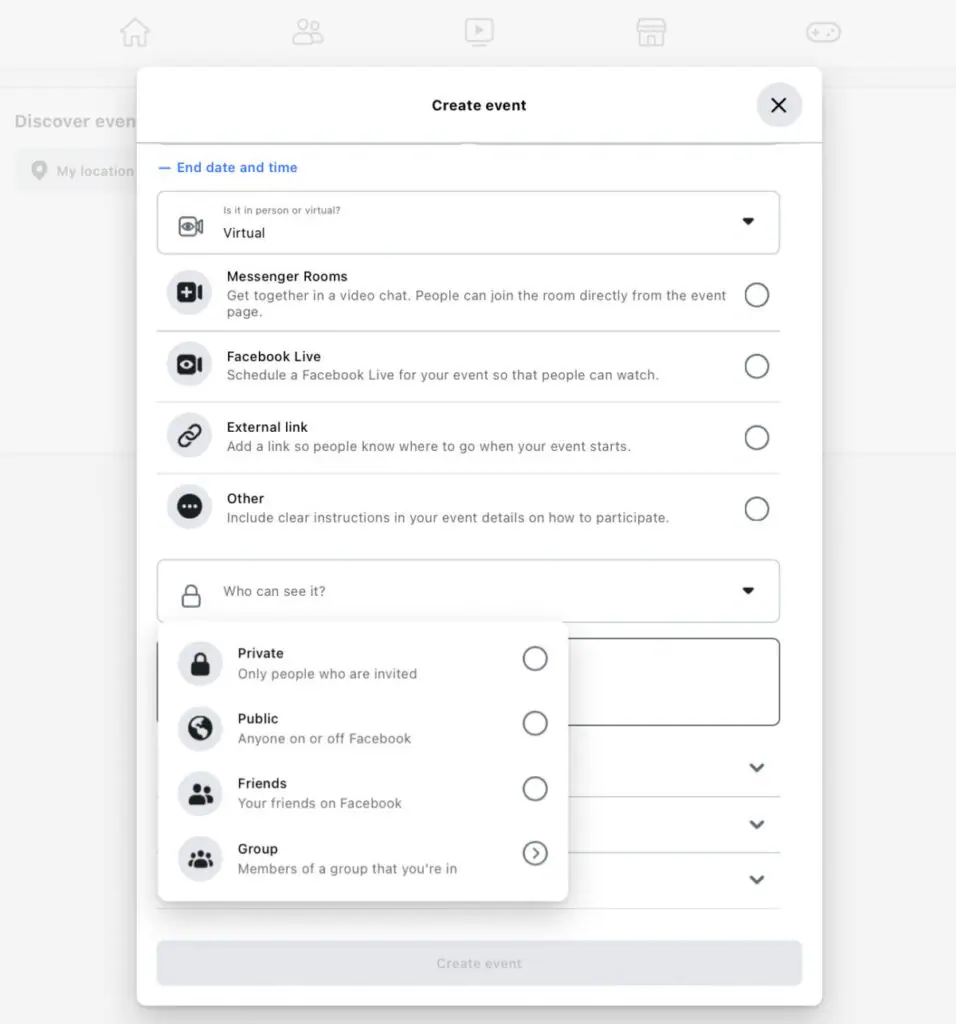
4. It’s crucial to specify whether the event is happening in person or virtually. For in-person events, include the location details. If it’s a virtual event, mention the platform—whether it’s happening through Messenger Rooms, Facebook Live, or external platforms.
5. After that, decide on the privacy level of the event. Do you want everyone, even those not on Facebook, to see it? Then set the event as Public.
Or maybe you prefer to keep it exclusive, allowing only invited guests. In that case, choose “Private.” If it’s a Private Event, you can also decide whether guests can invite their friends. Additionally, you have the option to limit visibility to your Facebook friends or members of the groups you’re part of.
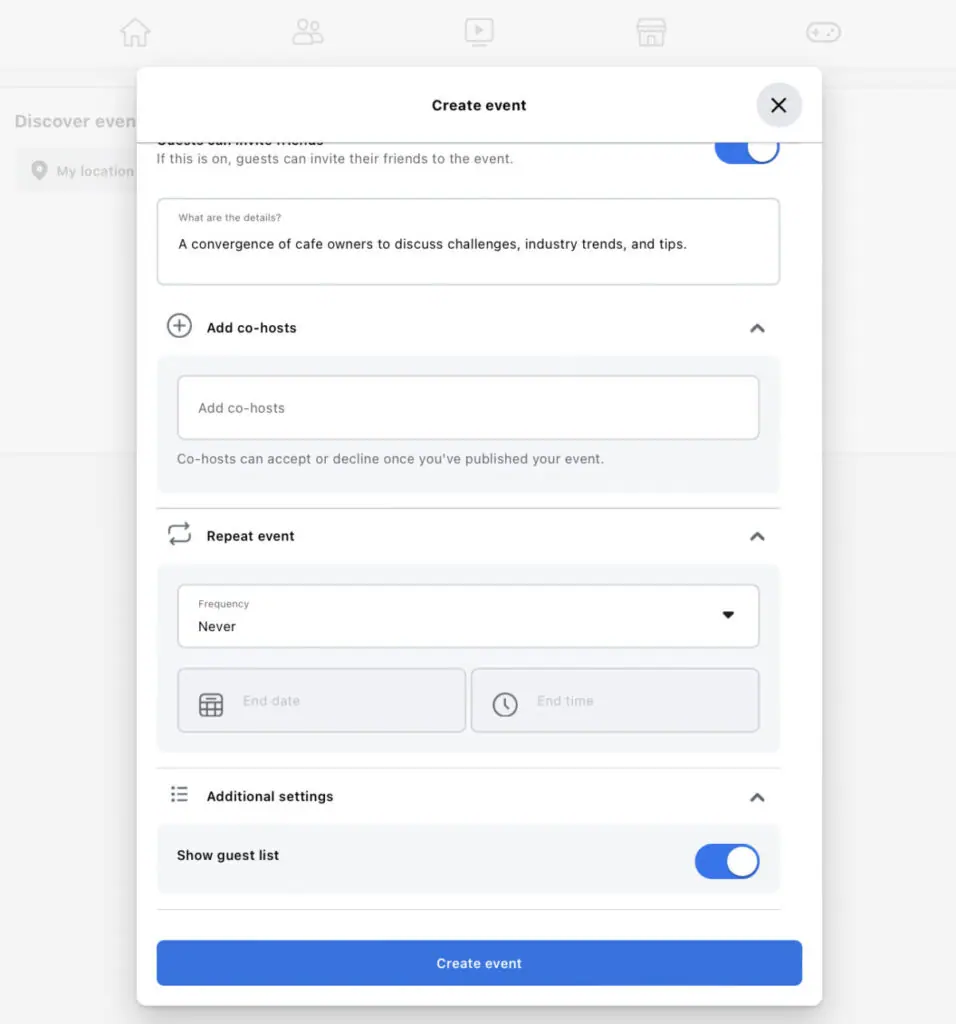
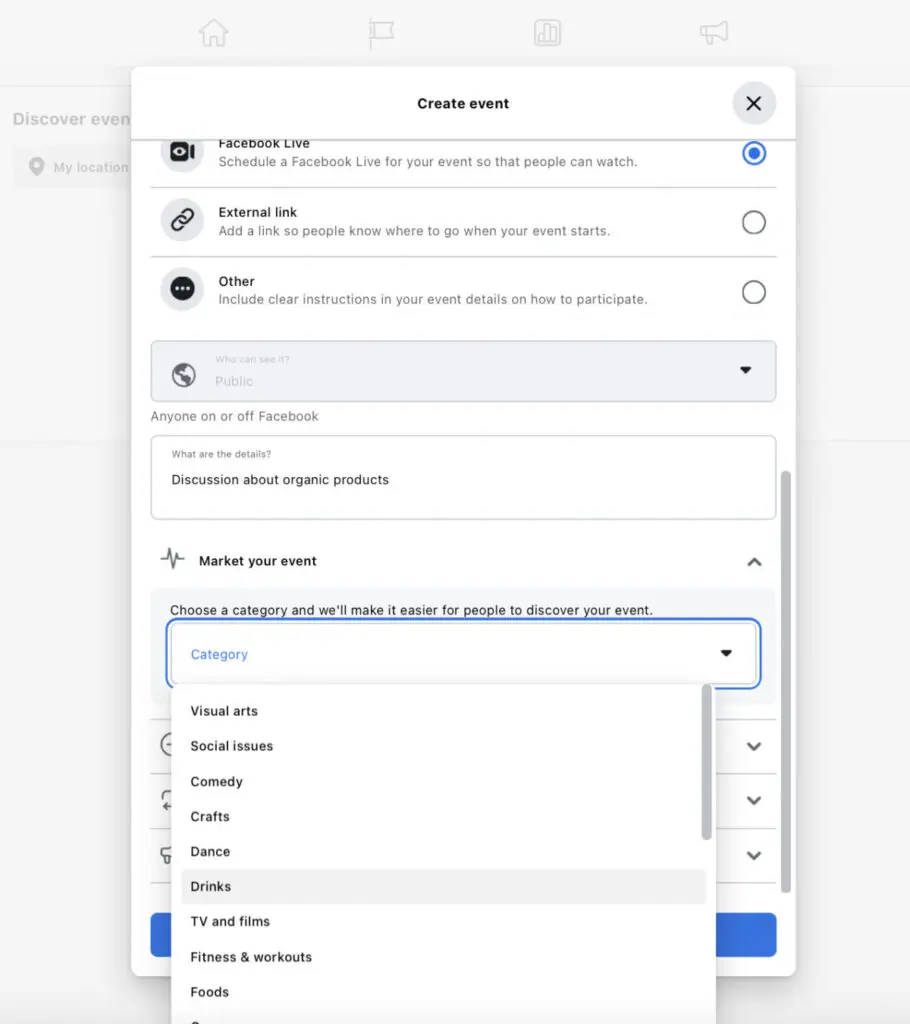
6. Once those details are sorted, provide more information about the event. Write a detailed description, including the target audience, the topic of discussion, planned activities, and so on. Ensure you highlight the benefits attendees can get from the event.
7. Following that, you can personalize the event further by adding a co-host (if you’re working with someone else) and deciding if the event should happen more than once. You can also choose whether to show the guest list to other users. Once all these details are in place, click on “Create event” to complete the setup of your Facebook Event.
8. If you opt to keep your event private, you’ll need to take an extra step to invite people. On your Event page, click the Invite Guests button to invite friends from your list and groups. Alternatively, click the Invite button above that, and you can invite attendees through email or SMS.

Create an Event from a Facebook Business Page
1. Go to the Facebook Business Page you want to use for your Facebook Event. Click the menu button at the top right corner of the screen and choose Events.
2. Similar to the Events page on your personal profile, you’ll be directed to a page where you can find relevant Events. Click on the Create New Event button in the left-hand panel.
3. Now, let’s name your Event. Choose a starting date and time, and it’s a good idea to add an end date and time to give people an idea of the event duration.
4. In the following step, decide if your event is in person or virtual. In-person events need a location, while for virtual events, Business Pages can pick between Facebook Live and external event hosting platforms. Keep in mind that hosting through Messenger Rooms isn’t an option for Business Pages.
5. Unlike events created from your personal profile, events hosted on a Business Page are automatically set as Public. This means anyone, even those not on Facebook, can see and join the event. You won’t have the choice to customize your event’s privacy.
6. After that, share more details about the event, explaining what it’s about and who it’s for. Highlight the key benefits of attending by mentioning takeaways and reasons to join.
7. A crucial step is selecting your event category. Under Market your event, click the drop-down menu and choose the category that best fits your event.
8. Once you’ve filled in these crucial details, you’ll get the option to add co-hosts. This is handy if you’re teaming up with other Pages or industry thought leaders and influencers. These co-hosts will be listed on your Event page.
9. Decide whether you want the event to repeat. You can set up a daily, weekly, or custom schedule.
10. Now, tweak the communication settings for your event. You can choose to display the guest list and decide who can post in the Event. If you allow everyone to post, it’s important to have posts approved by a host to prevent spam or unwanted content.
11. After sorting out all these details, click “Create event.” Your Event page will be set up automatically, ready for you to start promoting it.
Final thoughts
Events are a cool way to bring people together. Use Facebook Events to tell more folks about your in-person and online events, and try out the latest tricks to get the event noticed by a big crowd.