
If you’re managing a brand or business on Facebook, Facebook Business Manager is a must-have tool. As part of the Meta Business Suite, it helps you keep your Facebook business assets secure, organized, and accessible—whether you’re a solo entrepreneur or part of a larger team.
If you’ve been hesitant to set up Business Manager because it seemed complex, you’re in luck. This guide will walk you through everything you need to know, from setting up your account to launching your first ad campaign, in just 9 easy steps.
Let’s explore what Facebook Business Manager is, who can benefit from it, and how to get your brand set up with an account.
What Exactly is Facebook/Meta Business Manager?
Meta Business Manager, formerly known as Facebook Business Manager, is a free tool designed to help you manage and organize your business on Facebook.
In essence, it’s a central hub where you can handle all your Facebook marketing and advertising activities. You can also manage access for multiple users to your Facebook page, Instagram account, and other assets.
Here are some key features of Meta Business Manager:
- Central Dashboard: Track the performance of your Facebook and Instagram ads with detailed reports.
- Controlled Access: Grant vendors, partners, and agencies access to your pages and ads without transferring ownership.
- Separation of Business and Personal: Keep your business activities separate from your personal Facebook profile, avoiding distractions and mix-ups.
If you’re wondering whether setting up a Meta Business Manager account is the right move for you, let’s explore who can benefit from it and why.
Why Should You Set Up a Meta Business Manager account?
Here are some reasons where a Meta Business Manager account can be highly beneficial:
- Social Media Managers: If you manage social media for a brand, Meta Business Manager is crucial. It allows multiple team members to efficiently access and handle Facebook and Instagram business pages.
- Creators or Business Owners: Business Manager keeps your personal and professional profiles separate. Your audience will only see brand-related details, like your name and work email, not your personal Facebook information.
- Managing Multiple Assets: If you oversee various Facebook or Instagram assets—such as Pages, ad accounts, or apps—Business Manager centralizes everything, making it easier to stay organized.
- Working with External Vendors: If you collaborate with agencies or freelancers for your Facebook Pages or ads, Business Manager simplifies granting them access while retaining ownership of your assets.
If any of these situations fit your needs, it’s time to set up your Meta Business Manager account.
9 Steps to Set Up Facebook Business Manager
Before setting up your Meta Business Manager account, be aware of these requirements:
1. You need a personal Facebook account to create a Meta Business Manager account. Your personal account will be used to log in and verify your identity.
2. You can create a maximum of two Business Manager accounts.
With these requirements in mind, let’s dive into the steps for setting up your Meta Business Manager account.
#1. Set up a Business Manager account
1. Visit business.facebook.com. Log in with your Facebook or Instagram account, or create a new one if you don’t have one.
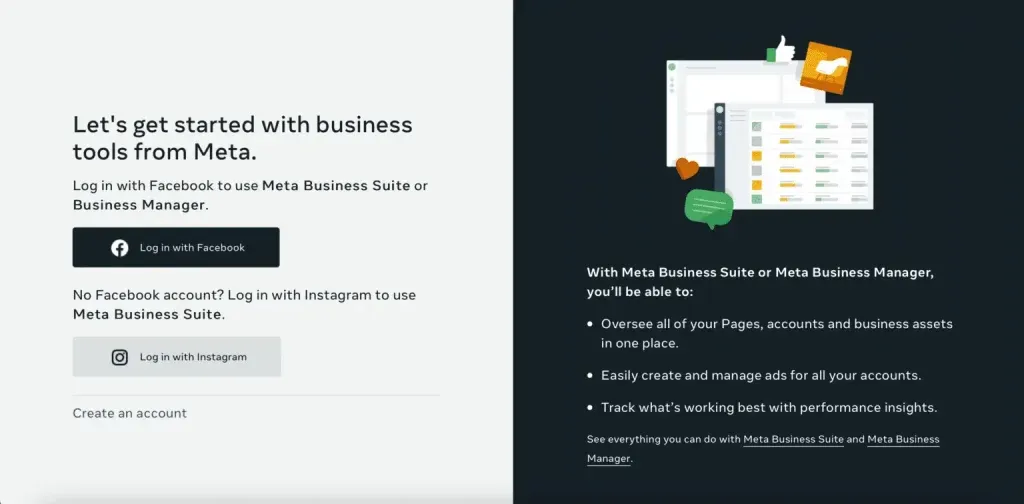
On the initial screen, you’ll be prompted to log in and learn about the benefits of a Business Manager account, such as managing your pages, accounts, and assets, creating and managing ads, and tracking performance.
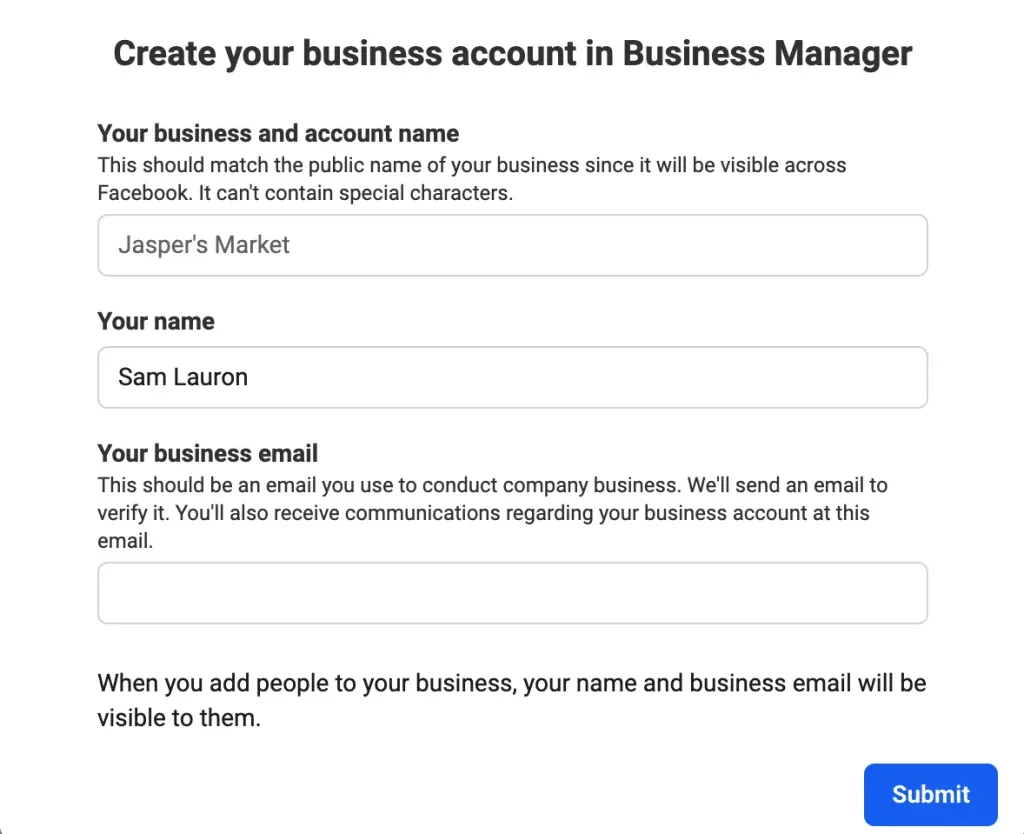
2. To set up your Business Manager account, enter your business name, account name, your name, and your business email. Click “Submit” to create the account.
3. Check your email for a message titled “Confirm your business email.” Click on “Confirm Now” within the email.
4. After confirming your email, you’ll need to provide additional business details. This includes your business’s legal name, address, phone number, and website.
#2. Include your Facebook Business Page(s)
You have a few options at this step: you can add an existing Facebook business page, create a new one, or request access to someone else’s page. If you manage pages for clients or other businesses, it’s crucial to use the “Request Access” option instead of “Add Page.” Adding a client’s page yourself might restrict their access to their own assets, which can lead to misunderstandings or issues in your professional relationship.
For now, we’ll focus on adding your own pages. If you haven’t created your Facebook Business page yet, check out our video tutorial above. Once you’ve set up your page, follow these steps to add it to Meta Business Manager:
- Access Business Assets: From the Business Manager menu, click on Business Assets, then select Pages and click the blue Add Pages button.
- Choose an Option: You’ll be presented with three choices: create a new Facebook Page, claim an existing Facebook Page, or request to share a Facebook Page.
- Claim an Existing Page: If you’re claiming an existing page, start typing its name in the text box. It should autocomplete below—just click on it. If you have administrator access to the page, your request will be approved automatically.
This will integrate your Facebook page into Meta Business Manager, allowing you to manage and track your business assets efficiently.
#3. Add Your Facebook Ad Account(s)
Be aware that once you add an ad account to Facebook Business Manager, you can’t remove it, so ensure you only add accounts you own. If you need access to a client’s ad account, use the Request Access option instead.
If you already have a Facebook ad account, you can link it by following these steps:
1. From the Business Manager dashboard, click on Add Ad Account.
2. Click Add Ad Account again.
3. Enter the ad account ID from Ads Manager.
If you don’t yet have a Facebook ad account, here’s how to set one up:
1. From the Business Manager menu, select Business Assets and then click the Add Assets button in the top right corner.
2. Choose Advertising from the drop-down options, and then select Ad Account.
3. Click Create a New Ad Account. Enter the necessary details, including the ad account name, time zone, and currency for billing.
#4. Invite team members to assist in managing your Facebook assets
Managing Your Facebook Marketing Team
Handling Facebook marketing can be overwhelming if you’re doing it alone. Facebook Business Manager lets you collaborate with a team, making it easier to manage your business page and ad campaigns.
Understanding Access Levels
Before adding team members, it’s important to know the access levels you can assign:
- Full Control: Previously called “business admin,” this role provides complete control over account settings, business assets, tools, and users. Full Control also allows account deletion. This role is best for business owners.
- Partial Access: Ideal for marketing team members or external vendors. This role limits users to only the tasks and assets assigned to them.
- Advanced Options: Provides additional access for users who need to view financial information. This option can be combined with Full Control or Partial Access.
Steps to Add Team Members
1. Access the People Section
- From the Business Manager menu, select People.
- Click the blue Add People button in the top right corner.
2. Enter Contact Details
- Input the business email addresses of the individuals you want to add. This step is for adding people, not agencies or other businesses.
3. Choose Access Levels
- Decide between Partial Access or Full Control based on the responsibilities of the team member. Facebook suggests limiting Full Control to a few trusted individuals. Click Next after selecting the access level.
4. Select Business Assets
- Choose which Facebook Pages and Instagram accounts you want to grant access to from the dropdown menu. This allows you to tailor access to specific business assets.
5. Review and Send Invitation
- Review the details of the invitation before sending it. You can add additional people as needed.
Managing Existing Team Members
1. Edit or Remove Access
- In the Business Manager dashboard, go to People.
- Click on the name of the person you wish to manage.
- Use the three dots in the right corner to edit their role or remove them from the team.
2. Handling Access Limits
- Note that each Facebook ad account can support up to 25 people. If you need to add more members, you’ll need to remove some existing ones first.
By following these steps, you can efficiently manage your Facebook marketing with the help of your team while keeping control over your business assets.
#5. Connect with Your Business Partners or Ad Agency
If you’re new to Facebook advertising, this step might not be relevant right away, but you can always revisit it later.
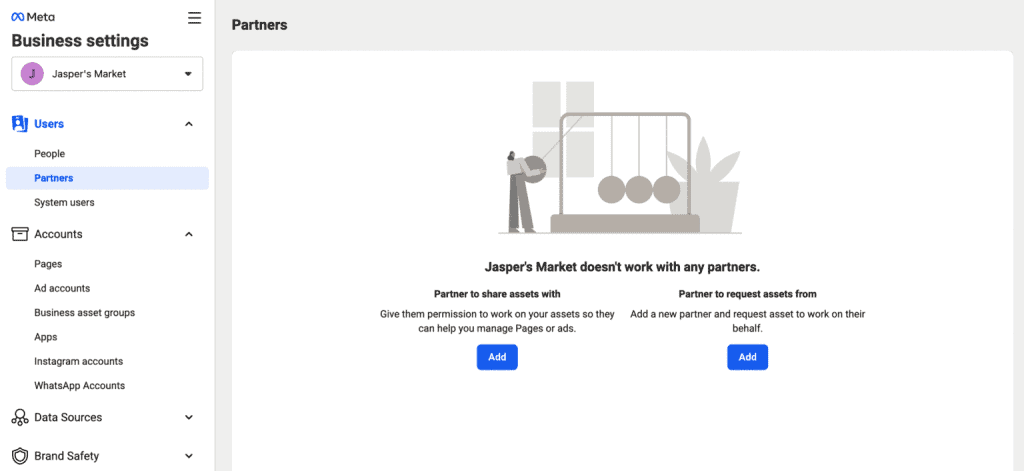
1. Go to your Business Manager dashboard and select Business Settings from the left menu.
2. Click on Partners in the left menu. Then, under Partner to share assets with, click Add.
3. Your partner needs to have a Business Manager ID. Request this ID from them; they can find it in their Business Manager under Business Settings > Business Info. Enter the ID and click Add.
By adding a partner, they will be able to manage permissions for their team members from their own Business Manager account. This way, you don’t need to handle individual permissions for everyone at your partner company—just manage access for the company as a whole.
#6. Add your Instagram account
With your Facebook assets set up, it’s time to connect your Instagram account to Meta Business Manager.
1. From your Business Manager dashboard, go to Business Settings.
2. In the left column, click on Instagram Accounts, then select Add. Enter your Instagram login details in the pop-up box and click Log In to link your account.
#7. Create Facebook Pixels
What is a Facebook Pixel? Simply put, it’s a small piece of code generated by Facebook. When you add this code to your website, it helps you track conversions, optimize Facebook ads, build targeted audiences, and remarket to leads.
Even if you’re not ready to launch your first ad campaign, setting up your Facebook Pixel now will provide valuable insights when you do. For now, let’s get your Pixel set up in Meta Business Manager.
1. Go to Business Settings: From your Business Manager dashboard, click on Business Settings.
2. Add a Pixel: In the left column, expand the Data Sources menu, click on Pixels and then click Add.
3. Name Your Pixel: Enter a name (up to 50 characters) for your Pixel and provide your website URL. Facebook will offer setup recommendations based on your site. Click Continue and review the Pixel terms and conditions before proceeding.
4. Set Up the Pixel: Click Set Up the Pixel Now to proceed with adding it to your website. This screen will offer options to either continue managing your business or start the Pixel setup.
You can create up to 100 Pixels with your Meta Business Manager account.
#8. Enhance your account security
One of the key benefits of using Meta Business Manager is the enhanced security it provides for your business assets.
1. From the Business Manager dashboard, go to Business Settings.
2. In the left menu, select Security Center.
In the Security Center, you can implement additional security measures. Here, you can choose to enforce two-factor authentication for all your page admins.
3. Set up two-factor authentication and select “Required for Everyone” to ensure maximum security.
#9. Launch Your First Ad
Here’s a quick guide to getting your first ad up and running in Meta Business Manager:
1. From your Business Manager dashboard, click on Ads in the left column.
This will bring you to your ads dashboard, where you can see an overview of recent ad metrics such as spend, reach, and engagement.
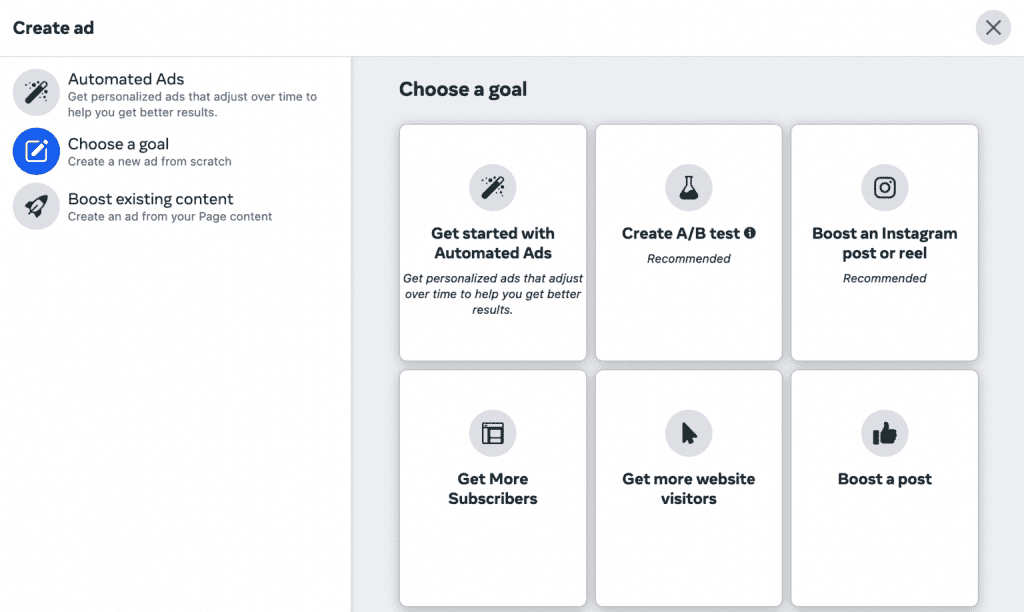
2. Click the Create Ad button in the top right corner to start a new ad campaign.
3. Follow the prompts to choose your campaign goal, target your audience, set your budget and schedule, and select your ad types and placements. You can also opt to boost existing content or receive personalized suggestions with Automated Ads.
Final thoughts
In a nutshell, Facebook Business Manager is your go-to tool for keeping your Facebook marketing efforts organized and effective. By setting up your account and linking your assets, you’ll streamline your ad management and boost your campaign performance. Give it a try to make your Facebook marketing smoother and more secure.