
Would you want to begin to Build Facebook Business Page but aren’t sure where to start?
Are you curious about the way to manage a page effectively and securely?
In this article, you’ll discover the way to build a Facebook page for your business and how to optimize it.
7 Simple Steps to Build a Facebook Business Page
Step 1: Setting Up a Facebook Page
Go to facebook.com/pages/create.
Choose the kind of Facebook page you want to build: business/brand or community/public figure. On this post, we’ll assume you’re making a page for a business or brand, so click on the Get Started button for that option.

Next, enter your business information. For your page name, use your business name or the name individuals are likely to search for when trying to find your business.
For category, type a word or two that describes your business and Facebook will recommend some options. If your business falls into more than one of the category options, select the one your clients are most likely to think about when they consider your business. We’ll show you the way to add more categories later.
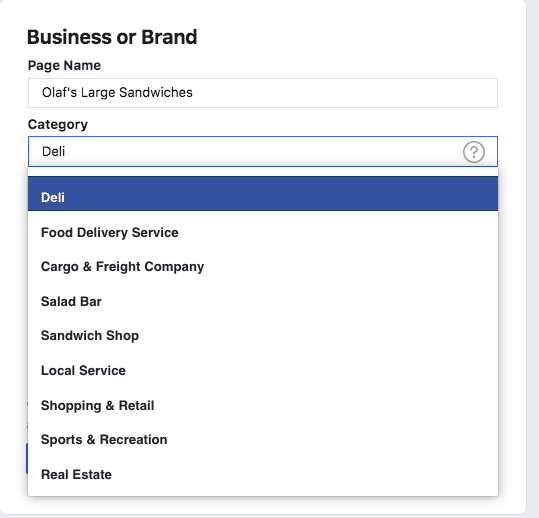
When you select your category, the box will expand to ask for a few further details, like your address and telephone number. You can select whether to make this information public or to indicate only your metropolis and state.
Once you’re prepared, click on Continue. Notice that doing so indicates your acceptance of Facebook’s Pages, Groups and Events Policies, so you might want to check those out before you proceed.
Step 2. Add Photos
Next, you’ll add a profile and cover pictures on your Facebook page. It’s necessary to create a great visual first impression, so select wisely here. Be sure that the images you select align with your brand and are simply identifiable with your business.
You’ll add your profile picture first. This picture accompanies your business name in search results and when you interact with customers. It also appears on the top left of your Facebook page.
In case you have a recognizable brand, using your logo is probably a safe option to build a Facebook Business Page. If you’re a celebrity or public figure, an image of your face will work like a charm. And in case you’re a local business, try a well-shot picture of your signature offering. The vital factor is to help a potential follower or client to recognize your page immediately.
As we explain in our post on The Complete Guide for Your Social Media Image Sizes, your Facebook profile image displays at 170 x 170 pixels on a desktop and 128 x 128 pixels on mobile. It will likely be cropped to a circle, so don’t put any critical details in the corners.
When you’ve chosen a nice photo, click on Upload Profile Picture.
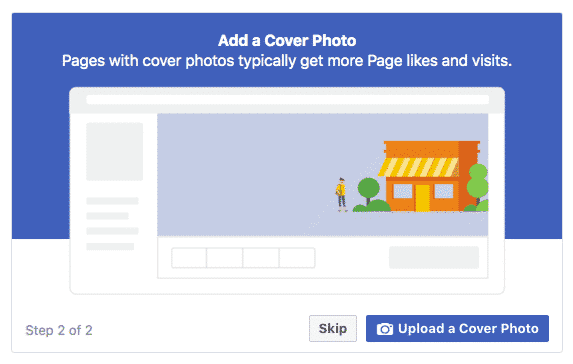
Now it’s time to decide your cover image, the most prominent image on your Facebook business page.
This picture should capture the essence of your brand and convey your brand personality. It’ll display at 820 x 312 pixels on desktop or 640 x 360 pixels on mobile. The picture must be at least 400 pixels wide and 150 pixels tall, however, the recommended size to upload is 720 x 315 pixels.
When you’ve chosen an appropriate picture, click on Upload a Cover Photo.
Ta-da! You’ve finished creating your Facebook Business Page, although this can be extremely sparse.
In fact, whereas the skeleton of the Facebook Page for your business is now in place, you’ve still got some work to do before you share it with your viewers. Don’t worry—your page isn’t yet visible to the public. (We’ll make that happen later in this post.) What you see now is a preview.
Step 3: Create your username
Your username, also known as your vanity URL, is the way you tell customers where to search out you on Facebook.
Your username can be up to 50 characters long, however, don’t use extra characters just because you can. You need it to be simple to type and easy to remember. Your business name or some obvious variation of it’s a safe guess.
Click on Create Page @Username in the left menu to set up your vanity URL.
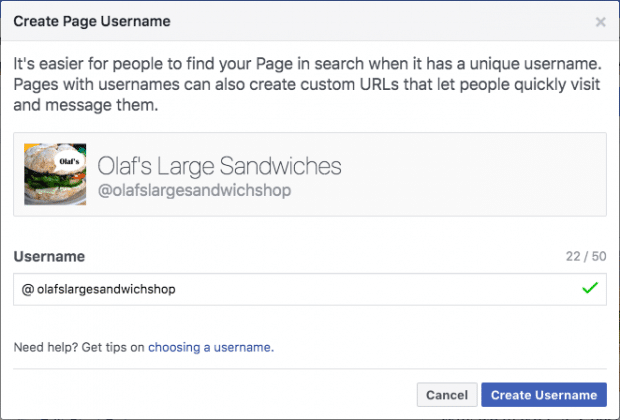
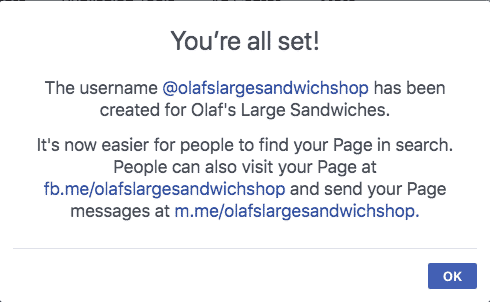
Click on Create Username once you’re finished. A box will pop up displaying you the links clients can use to connect with your business on Facebook and Messenger.
Step 4: Add your business details
While you might be tempted to leave the details for later, it’s necessary to fill out all of the fields in your Facebook Page’s About section right from the beginning.
As Facebook is often the very first place a client goes to get details about you, having it all there’s necessary. For instance, if somebody is searching for a business that’s open till 9, they want to confirm this data on your page. If they can’t find it, they’ll surely keep looking until they discover one other place that’s more forthcoming.
To begin filling out your business details, click on Edit Page Info in the top menu. From this screen, you can share all the necessary information about your business.
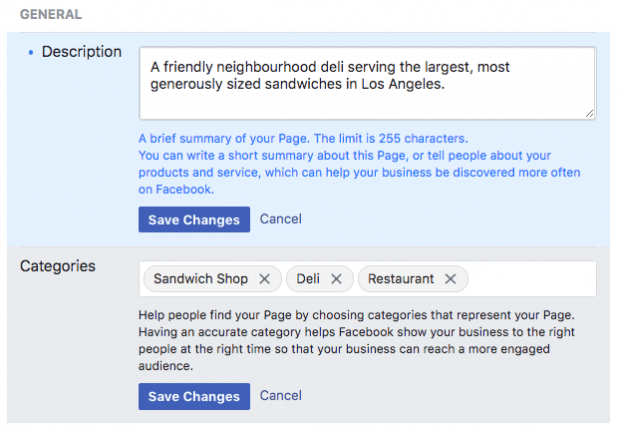
Description
This can be a brief description that appears in search results. It ought to be just a few sentences (maximum 255 characters), so there’s no must get too elaborate here. We’ll show you where to add an extended description later.
Categories
Right here you’ll see the category you entered in Step 1. In case you like, you can add additional categories here to make sure Facebook shows your page to all the suitable customers.
Contact
Add all the contact details you need to make public, including your cellphone number, web site, and e-mail.
Location
In case you have a physical storefront or workplace, check to make sure that your location is marked correctly on the map. You can also add details about your service area, so people know, for instance, which neighborhoods you deliver to.
Hours
If your business is open to the general public during particular hours, enter those here. This information appears in search results.
Extra options
If related, enter your Impressum, price range, and privacy policy link. An Impressum is an authorized statement of ownership, and it’s generally only required in some European nations.
Click on Save Changes under each section to implement your changes as you go.
Step 5. Tell your story
You’ve filled in all the straightforward particulars about your business, however, there’s not much here yet to tell people why they should engage with your business on Facebook.
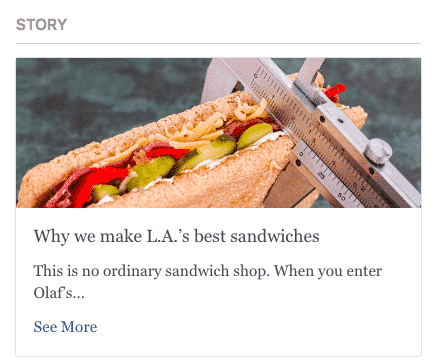
Luckily, there’s a piece of your Facebook business page where you can add a longer description of your business. To access it, click on See more in the left menu, then click on About, and then click on Our Story on the right-hand side.
On this part, you may add a detailed description of what your business offers clients and why they should Like or Follow your Page. It is an excellent place to set expectations. How will you interact with followers via your Facebook Page? Offer a compelling reason for them to stay around.
Enter a headline and textual content on your story, then add a relevant picture. Once you’re completed, click on Publish.
Step 6. Create your first post
Before you begin inviting customers to like the Facebook Page for your business, you should publish some valuable content. You can create a few of your personal posts, or share relevant content from thought leaders in your industry.
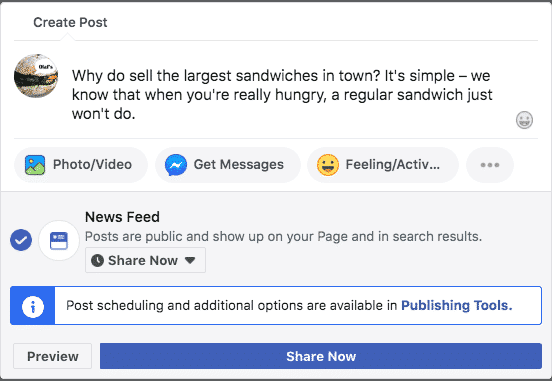
You might additionally create a specific kind of posts like an event or product supply—simply click on one of many options in the Create box at the top of your page.

Be sure that whatever you publish provides worth for your guests when they arrive at your Facebook page so that they’ll be inclined to stay around.
Step 7: Publish your page and invite viewers
Your Facebook business page now represents a robust online presence that will make potential clients and followers really feel comfortable interacting with you. It’s time to hit that huge inexperienced Publish Page button in the left-hand menu.
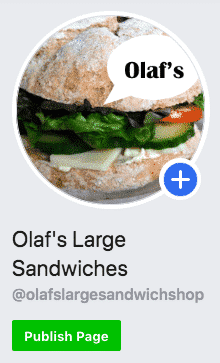
That’s it! Your page is live and visible to the world. Now you should get some followers!
Begin by inviting your current Facebook buddies to like your page. Use your different channels, like your website and Twitter, to promote it. Add “follow us” logos on your promotional materials and e-mail signature. In case you’re comfortable doing so, you can ask your clients to review you on Facebook, too.
To increase your viewers rapidly, check out our post on how to get more Facebook Likes.
Simple methods to optimize your Facebook business page
Add a call to action
There are tons of reasons why people visit your business on Facebook, and you could not be able to present them with all the information they need right on your page. However, you may provide them with an option to get it by setting up a call-to-action (CTA) button.
Facebook’s built-in CTA button makes it very simple to offer the client what they’re searching for, including allowing them to engage with your business in real life.
The suitable CTA button will encourage guests to learn more about your business, store, download your app, or book an appointment.
To add your CTA, click on the blue box that says + Add a Button, then select which type of button you need.
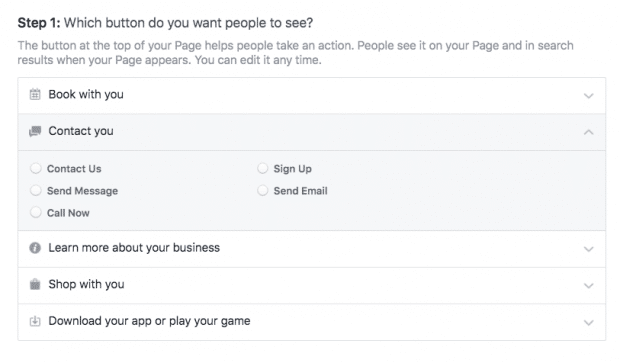
For every kind of CTA, you’ll be given a number of text options to select from. Choose the option you like, then click on Next.
Depending on the button you selected, you could be requested to pick some further choices. Once you’re prepared, click on Finish and your call-to-action button will go live.
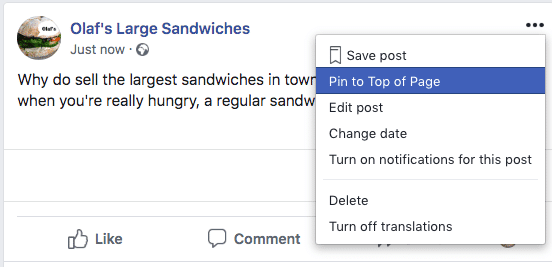
Add a pinned post
Is there necessary data you need all guests to your page to see? A promotion you don’t want them to miss? A top-performing piece of content you want to show off? Put it in a pinned post.
A pinned post sits on the top of your Facebook business page, slightly below your cover picture. It’s an important place to put an attention-grabbing item that will draw your guests in and make them want to stick around.
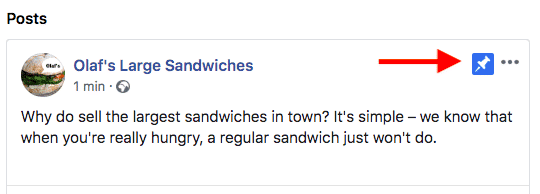
Begin by publishing a brand new post, or scrolling down your feed to search out an existing post you need to pin to the highest of your Page. Click on the three dots on the top right of the post, then click on Pin to Top of Page.
When you’ve pinned the post, you’ll see a blue thumbtack icon in the top right corner.
Make the most of templates and tabs
Tabs are the completely different sections of your Facebook page, like the About section and images. You possibly can customize which tabs you need to include and the order in which they appear in the left menu of your web page.
In case you’re unsure which tabs to include, check out Facebook’s numerous templates.
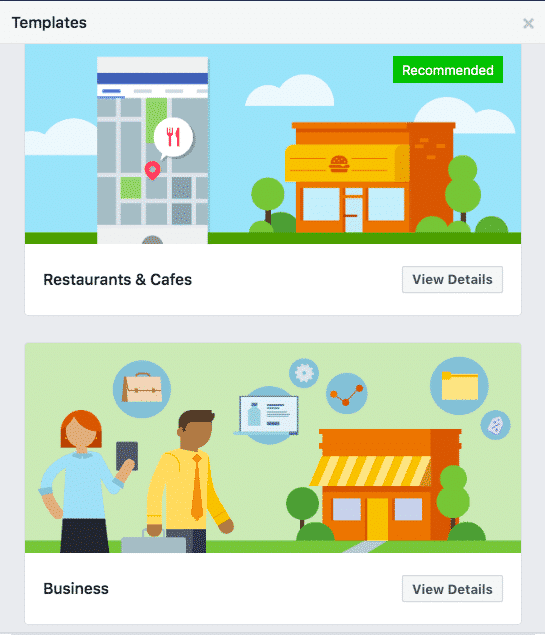
Each template has a set of buttons and tabs designed for particular varieties of business. For instance, the Eating places & Cafes template contains tabs for provides, critiques, and occasions.
To access templates and tabs, click on Settings in the top menu, then Templates and Tabs in the menu on the left.
Like different pages
Since Facebook is, after all, a social community, it’s a good suggestion to use your page to construct a group for your business.
One solution to construct a group is to connect with other pages that are related to your business but not competitors.
For instance, in case you run a store in a popular purchasing area or mall, you may connect with different shops in the same area. Consider this as an online version of your native business improvement association or chamber of commerce.
In case you have a virtual business, you may connect with different businesses in your industry that would provide further worth to your followers without competing directly with your products.
To comply with different businesses, navigate to their Facebook page, then click on the More icon (three dots) below the page’s cover picture. Click on Like as Your Page. In case you have more than one Facebook business page to build, select which one you need to use to like the other business, then click on Submit.
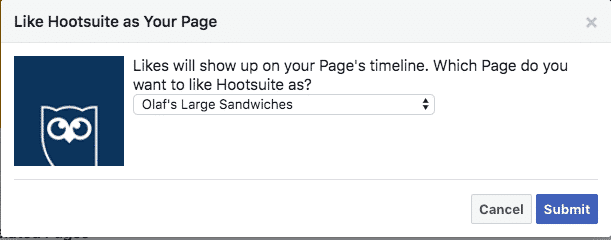
This business will now appear in the Pages Liked By This Page section on the suitable of your page.
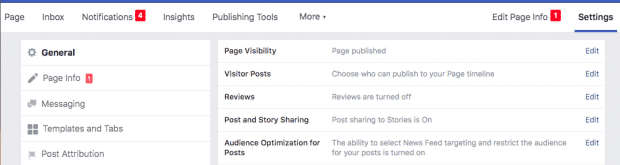
Review your settings
Your Facebook page settings can help you get into some fairly advantageous detail about who can administer the page, where your posts are seen, words banned from the page, and so on. You may as well see people and pages who’ve liked your page, control your notifications, and so much more.
Consider the Settings tab as your behind-the-scenes console for each adjustable parameter available to you. Take some minutes to go through each setting and ensure that it’s optimized for a way you need to handle the Page and how you want your viewers to interact with you.
To access your settings, simply click on Settings on the top right of your Facebook page.
Verify your settings commonly, as your preferences and requirements might change as your business—and social following—grows.
For even more control over who can administer your page, and manage the roles filled by group members, contractors, and businesses, consider setting up Facebook Business Manager.
Learn from Page Insights
The more information you have about your viewers, the more content you’ll be able to create to satisfy their needs.
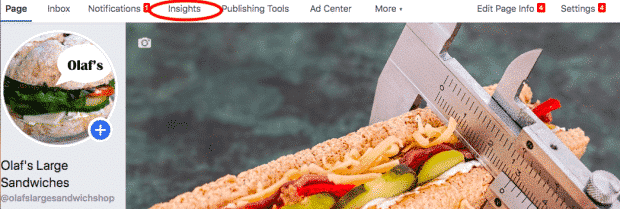
Facebook Page Insights makes it simple to collect data about how your followers are interacting with your web page and the content material you share. To access Page Insights, click on Insights in the top menu of your Facebook business page.
Insights provide you details about your page’s overall efficiency, including some information on viewer demographics and engagement. You possibly can see metrics on your posts so you’ll be able to understand how many people you’re reaching. You’ll additionally see how many comments and reactions are gained from particular posts—information that helps you plan future content material.
A key feature of Insights is the flexibility to see how many individuals have clicked in your call-to-action button, website, cellphone number, and address. This information is divided by demographics like age, gender, nation, metropolis, and gadget, making it simpler so that you can tailor future content material to your audience. To access this data click on Actions on Page in the left menu.
For more details, take a look at our post on how to use Facebook Page Insights.
Hyperlink to your Facebook Page from different web pages
Backlinks help increase credibility when you build a Facebook Business Page and will help enhance your search engine ranking. In addition, they help direct new potential followers to your web page.
Include a link to your Facebook page on the bottom of your blog posts and where appropriate on your website. Encourage other corporations and bloggers to do the same once you collaborate.
Once your Facebook page is ready and optimized, take a look at our full 6 Daily Habits for Facebook Marketing Success to take your Facebook technique to the next level.